Showing posts with label sewing DIY. Show all posts

Monday, May 28, 2012

day 352: party favours for the upcoming pinterest party

pinterest party gift envelopes
day 352 and it's no secret i am getting close to my goal!  on the last day we are having a party to celebrate and with all good pinterest parties there's a whole lot of thank you's to make to those that have helped, supported, inspired, and taken the many urgent road trips to find vital supplies for the days creating.  i wanted to make something worthy of a pinterest thank you and have taken inspiration from clever charlotte's valentines felt envelopes as the perfect beginning.  this inspiration works perfectly with just something i made's envelope template to make the perfect pinterest thank you envelopes :)

the envelope template is available for free download at just something i made and is also pinned to my paper crafts board.  i printed the envelope out at half its size so the finished product would perfectly fit a gift card ... you can see where i'm going with this thinking ;)  the actual envelope was not stitched but glued together and then adhered with a pinterest logo i printed out then cut out in red felt.

the envelope template

half size is perfect for gift cards ;)

happily decked out with its pinterest logo!

outcome:  these are perfect for my needs.  thank you's for a long pinterest year happily sitting in hand made felt envelopes adorned with THE logo ... the ideal way to gift some love to those that have supported me unconditionally.  i think these bring together some of my favourite things from the year, felt and hand made ... if only i could find some way to add blackboard paint ... ;)

my thanks to clever charlotte and just something i made for the inspiration to come up with something i look forward to gifting out in 13 days time!  

Sunday, May 27, 2012

day 351: felties

my three newest friends!

day 351 and i have found the answer to my current felt obsession ... felties.  i saw this book on pinterest while i was browsing all things felt a while ago and ordered it from the local library.  it finally arrived yesterday and now i have materials to get started!

the inspiring book found on pinterest

i thought i would make a couple of them today and work my way through the rest of the book before it's due back at the library in four weeks time.  this lovely lady (pinstrip bindi) made all of them over a long weekend, and they turned out so well so i was inspired to get started with the first one :)  both links are pinned on my sewing diy board.

first up was pensive rabbit, it was then i realised just how small and sweet these cuties are ... still took me an hour to make this little one!

this is when i realised how so very small these lil critters were!


next was sleepy fox, so cute i may have to make something to put him on so i can have him close by always ;)


lastly for today was messenger bear, couldn't find a little sticky for the front of the bag, but it seems to still work without it thanks to the news in the bag :)


outcome:  what can i see they are so adorable!  steve did ask me what i was going to do with these little creatures ... honestly, i have no idea but they were just too cute not to make.  i need to find someone with a baby that needs a few friends of the soft variety, they would look so sweet hanging as part of a mobile ;)

thank you nelly pailloux for creating such an inspiring book! so pleased i found this on pinterest to help fuel my felt obsession!

two weeks today i am having a pinterest party ... ;)

Monday, May 21, 2012

day 345: feltie owl friend

meet oscar owl

day 345 and i have reached the mystical realms of having a blog that has had so many repins i am now considered spam .... THANK YOU to you all for repinning!  and as soon as pinterest take me off their spam list you will continue to be able to repin.  at the moment i can't even repin my creations to my 365 board, i am hoping they will get it sorted before 365 days are up :)

on with today's creation, yes i am back to the felt and sewing.  you know when you have really enjoyed or are so happy with a project you have completed you want to keep doing it?  that's where i am at with felting at the moment, i am loving the little trinkets i have made from felt over the last week or so and just want to keep making more.  this cute little owl spoke to me and i figured as polly had a babushka or two recently join her in her bedroom ben could do with a new friend too ... i am thinking oscar is a name that will stick with this wee owl.

the owl tutorial comes from home life, a great website out of australia for home décor.  the tutorial is also pinned to my sewing diy board on pinterest.  good news for those of us who can't draw, the tutorial also comes with a printable template ... yippeee

start with some felt and fabric scraps

do a whole lot of cutting

an hour and a half later you have a fine looking oscar owl :)

outcome:  cute ... took a little while with to come together with all the hand sewing but it was definitely satisfying once oscar was all put together :)  the pattern was easy to follow along with the template and i plan to take some time (once i find some!) to look around home life and find other projects to fill our home with :)

my thanks to home life for the tutorial and all the good advice that was incorporated into it.  i love when something you see turns out just as well in reality!


Tuesday, May 8, 2012

day 332: needle book


the finished needle book, complete with today's babushka gretel

day 332 and i got back into some needle crafting yesterday.  i have always done a bit of embroidery over the years but never consistently.  it was really nice having all my embroidery threads out ooohing and ahhhing at all the pretty colours.  it wasn't so nice trying to find the right needle with the right eye size because all my needles for everything are kept in here:

yes, i agree ... not ideal

time for a needle book me thinks.  and as a bonus i figured the perfect needle book would also have one of my new friends on the front ... lets call this one gretel.  if you want to find out how to make these gorgeous little babushka or eastern european grandmother felt ladies you can go here and get the details.  the first one i made yesterday stole my heart, this one has captured a little bit more of it too :)

meet gretel

i saw these gorgeous books on kerrin quall's blog ya think?  they are also pinned to my sewing diy board on pinterest.  kerrin used her felt needle books as little gifts for.  i thought they were adorable and looked relatively easy to make given the main material used was felt.  i like felt it doesn't fray, doesn't require its edges to be finished and each side of the fabric looks the same ... felt is my type of sewing ... EASY.  kerrin doesn't include the instructions, there are only pictures of her stunning handy work to lust after, her flickr board has the most amazing felt creations on it ... beautiful.

anyway back to the creating of the day, you need felt and some embroidery floss, a button and a non-stuffed version of yesterday's babushka ... in my case gretel and not erma who is the padded sister who adorns my nightstand :)  as there are no directions for this needle book, i have made some up for you ... well, sorta

what you need plus a button, rotary cutter optional but it does make things easier.

  • cut a piece of felt 11" by 4" this piece is the cover that wraps around your felt pages (in my case the red felt)
  • cut 4 pieces of felt 3.5" by 4", these pieces are the pages for your needle book
  • next fold the red piece of felt in half and lay the felt pages inside so it looks like an unbound book.  you will notice there is a large (~1") overhang of the red felt on the cover and back cover ... this is good news you will see why soon.
this is how the "book" should look with its over-large cover
  • closing the book, blanket stitch along the spine making sure you capture all the page pieces ... this blanket stitch isn't just pretty it also binds the book :)
  • now that your book is bound open it up and on the inside front cover sew a button at the bottom in the middle.
the inside front cover where you will sew the button
  • once the button is sewn turn to the inside back cover and cut a hole for the button to go through.  as felt stretches make sure the button hole is smaller than the actual diameter of the button.  this closes the needle book so it doesn't flop around and now you know why we neede that extra bit on each end of the cover :)
the back book cover were you need to snip the button hole

this is what the back cover looks like when the button is done up :)

  • lastly place the book in front of you and you will have the back of a sewn button staring at our.  not pretty, but that is were gretel comes in (or whoever your babushka is) ... she is glued to the front and covers the back sewing of your button.

the unsightly button sewing on the front cover is about to be covered by my new friend gretel
  • you are done, add your needles to the pages and call it a day!
happiness is a needle book full of organised needles

outcome: stoked, i may even make some of my own as gifts :)  needle books are completely underrated ... seriously, it was joyous putting in my needles by size and type.  i never knew until today how nice it was to look for the needle you need in a book ... it was definitely an ah-ha moment :)

my gracious thanks goes to kerrin at ya think?  for her gorgeously inspiring felt needle books ... i'm telling ya, it's creations like today's that make me adore pinterest, my quality of life definitely improved today with the making of a needle book ;)

Monday, May 7, 2012

day 331: felt babushka doll

the finished babushka or grandmother doll ... i love her
day 331 and i have been taken by babushka's or eastern european grandmother dolls.  i have always loved the matryoshka dolls (russian nesting dolls made from wood) and the new babushka's i see everywhere remind me so much of them.

i found this gorgeous pattern yesterday to make a little 2.5" doll in felt on pinterest and she was too adorable to wait long to make, so i made her today!  the free tutorial and template is from sew to speak and is pinned to my sewing diy board.  you need felt in various colours, embroidery floss, glue, and a bit of stuffing.

after some cutting (something i seem to be doing lots of at the moment ... seriously considering taking up jen's idea of buying a cutting machine of some sort!) and a little bit of gluing i was into the sewing and really enjoyed it.  i thought i would be totally intimidated doing the face but i actually really enjoyed giving her a personality.  once the stitching was done, i put a little stuffing in her to make her a jolly grandmother.  you know the sort, rounded in all the right places and soft in all the bits that count ;)

the bits and bobs required

the cutting done, now for the fun part :)

attach all the bits to the front of the felt doll

embroider a face and hair, add some rosy cheeks with a coloured pencil

sew the back to the front with a blanket stitch and give her a little stuffing before finishing the stitching around her.

outcome:  i fell in love with her so much i didn't put a hanger on her as she is sitting on my bedside table keeping an eye on me :)  she will not be perfect to many who see her, but to me she is perfect in every way ... i am thinking i will have to make more to see if i feel the same way about all of them or if it is just her that has stolen a little bit of my heart.

my sincerest thanks to sew to speak for the generously free pattern to make this little grandmother and the wonderful tutorial that goes with it.  you warn your readers they are addictive, i guessing that's not going to stop anybody from making these because they are totally worth giving up the time to make over and over again.

Wednesday, February 22, 2012

day 258: bi-fold wallet

hey presto ... one hour later and you have a cool, unique wallet :)

day 258 and i am making myself a wallet today as the one i purchased while on holiday is sadly falling apart :(  today's bi-fold wallet tutorial comes from modest maven and is pinned to my sewing diy board on pinterest.

i love creations like today's as they give me a chance to use some really pretty fabric's on something small and very handy.  i chose my fabrics, and used my handy dandy present from santa (a rotary cutter) to cut out all the pieces of fabric, then began sewing and within an hour i was done!

the pieces for today's creation and my rotary cutter (i'm quite proud i own such a serious craft tool!)

the card pockets ready to go
ready for the finishing touches and turning the lining in.
the finished wallet, in action!
outcome: cute, no coin compartment but this is perfect for all my cards.  one day i will learn to sew a zipper into something and solve that small problem.  in the meantime i have a really cool wallet that uses very cute fabric and was not too hard to sew together.  the tutorial was really easy to follow with plenty of pictures so you can't go wrong :)

my thanks to modest maven for the awesome tutorial that has solve my wallet issue without costing me a cent :)  love that, and that it was so easy to put together.

i have heard from both hey mickey (hi michelle) and from jen so their give away boxes will be packaged up tomorrow for everyone to have a REAL peek inside :)  the next give away will be around st patrick's day and i am thinking we will go green :)

Tuesday, February 21, 2012

day 257: pyjama pillow

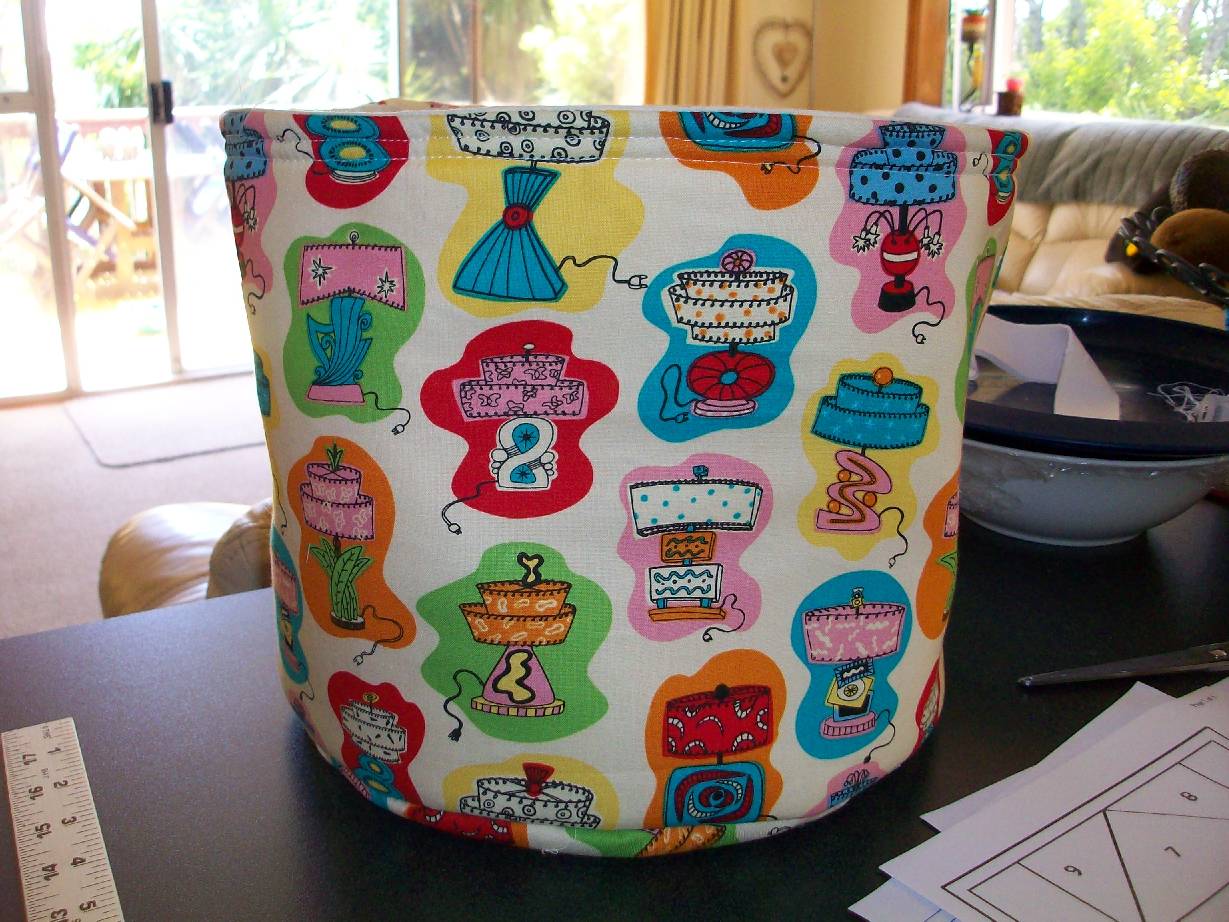
the finished pyjama stash pillow!
day 257 and after my mammoth day at the sewing machine yesterday i wanted an easy creation for today.  i found this pj pillow tutorial by virginia of gingercake on prudent baby and thought the concept was fantastic.  i pinned it to my sewing diy board and thought one of these pillows for ben to stash his pj's in would be perfect because he is forever losing his jammies down the back of his bed.

i can't sew circles and while i absolutely adore the one made by virginia, i needed to create something that used straight lines!  i decided a square overlapped pillow would do the job nicely and it sounded easy enough for me to attempt today.  i have added a few more pictures than i normally would of the process below to show you how i made a square one.  just in case you too were scared of sewing circles and wanted to make a square one!

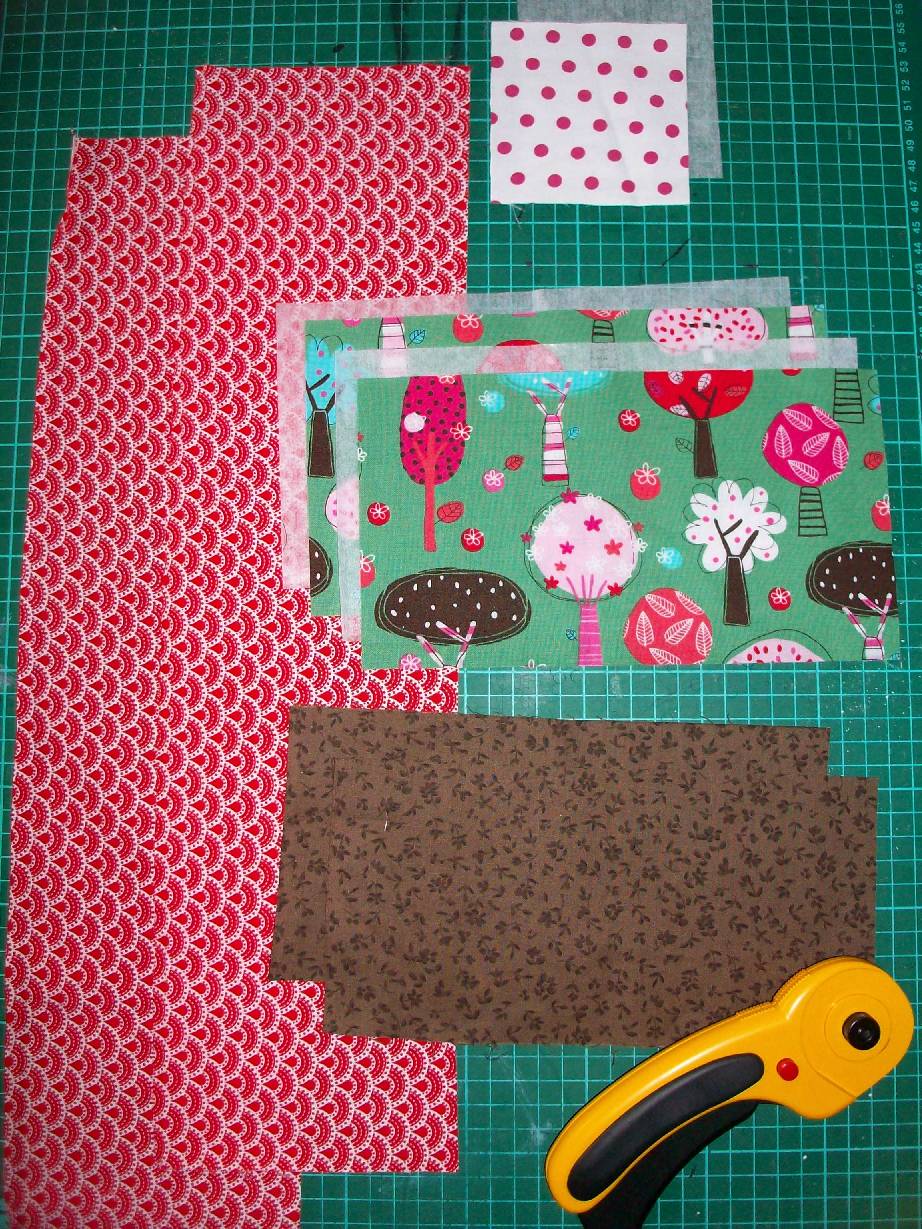
the pillow uses one piece of fabric and one piece of quilters batting and that's it for what you need bar the sewing machine.  as this is for a ten year old boy's pj's i went with an elongated size.  if it was square i figured the pillow would flop down too much so i went with a low rectangle shape. i also added in the batting so that if their weren't pj's inside the pillow would still hold it's shape.

all that is required for today's creation.
start by folding over and then folding over again along the shortest side of the fabric.
iron the folds in place so you have a good overlap, then measure your batting to fit.  make sure you cut your batting 1/2" narrower than the width of the fabric ...
... the reason you want your batting smaller is so you don't sew it in the first seam of your french seams, this means when you turn it inside out your batting won't cause any bulkiness.  it's at this point you realise my sewing knowledge is limited but that the photos help you figure out what i am trying to say ;)
its during the second sewing of the french side seams that you sew the backing in place.
turn out so you have the right side out, the batting should now be sewn in place with the side seams and you are finished
the completed pillow stuffed with the boy peeps pj's!
much better than trying to find the missing top or trunks down the side of his bed :)
HAPPY days, my friends, happy days!
outcome: really cool, and it looks good on ben's bed too, not to mention i will now be able to stop fishing behind his bed looking for missing pj parts!  i love when a creation is pretty to look at, easy to make, and has a useful purpose ... they are definitely my favourite kind!

sincere thanks to virginia of gingercake for the wonderful concept AND the tutorial is really indepth and would be easy to follow if you are into sewing circles!  as for prudent baby let me just tell you, the tutorials and all they offer are completely addictive ... there were so many projects i wanted to try, i didn't know where to start!


Sunday, November 20, 2011

day 164: fabric bucket

the finished fabric basket ... this one is about 9" high 
day 164 and today i had the best day sewing at a dear, dear friends.  dee and i made fabric buckets today for my pinterest creation ... i tell ya, there is nothing better than spending the day chatting about crafts and crafting!

a while ago i pinned these fabric buckets from 2 little hooligans to my sewing diy board and today we decided was the day to make them ... so we did!  the tutorial from christina is fabulous and we were done with our two buckets in just over an hour.  christina even provides you with a pattern to print if you want to create a nest of three buckets.  dee had a large picnic plate that we used as the base and for the sides you just measure the circumference of the plate and the height of the bucket is to your pleasing.

the red gingham one is mine and the one with the
cool retro lamp shades is dee's ... next up you add the lining

lining added and the bucket is all but
complete with just the heading stitching to do
my completed bucket, just needs some felt holly don't you
think?

outcome: OVER THE MOON!  these buckets were a joy to make and the final outcome is so awesome!  i plan to make many more in the next couple of days.  the red gingham one i made today is going to have a felt holly attached to it to make it a christmas one!  i also plan to make two sets of nesting buckets as christmas presents for family they worked so well!  my house will soon be littered with these buckets as they are so useful and you can make them purpose sized for your needs ... how cool is that :)

a very big thank you to christina for this brilliant tutorial on making fabric buckets, they are simply a joy to make and so incredibly useful.  her site is amazing, full of fantastic crafting and wonderful eye candy as well!

we were done so quickly with the fabric buckets, my sweet friend dee, had time to teach me paper piecing for quilting.  i had the BIGGEST thrill today, i ACTUALLY quilted a mug rug, complete with a christmas tree.  AND the mug rug even works ... check that out!

i still find it amazing that i quilted this mug rug today!
i couldn't have done it without you dee, thank you
so much my friend :)

i'm off to find more christmas mug rugs to pin to my boards so i can make one for each member of the family!

Wednesday, November 16, 2011

day 160: christmas gift bag with ruffles!

the completed ruffle gift bag!
day 160 and i am back to the sewing machine again today.  today i have chosen to make a christmas gift bag with ruffles!  i keep seeing these gorgeous ruffle bags on pinterest and have been so inspired to make one as a holdall.  before i attempt something like that i wanted a creation to practice with and i thought a christmas gift bag would be perfect.

my inspiration came from this wonderful website sew.craft.create.  heidi saw this one on pinterest by blue robin cottage on the u-create crafts website which has a wonderful tutorial for making a ruffled tote.  i pinned it to my sewing diy board knowing it would be perfect.  i was totally inspired by both of these but wanted to make my own tote and have unfrayed edges for my ruffles.  i used purl bee's 20 minute tote tutorial to make the bag, complete with french seams!  this is the same tote design i used for all those halloween goodie bags on day 124, so i know the bag works well  :)

the supllies, the circles are to make some flowers with

the twenty minute tote is so easy ... this is step one, step to
is to sew up the sides ... easy aye!

the attached ruffles .... this was HARD work!

a close up of the ruffles and the two flowers i made
to go up the top of the gift bag :)

outcome:  ruffles on a bag are so much harder than they look.  it is really hard to get a straight line when your ruffles want to curve all over the show!  if i were to make this again i wouldn't bother with the unfrayed edges as that just added to the stress!  in the end i am really chuffed with this bag, but to make another like this probably won't happen in the near future, it was a lot more work than i anticipated!

many thanks to heidi at sew.craft.create and also to blue robin cottage for showing me how to make a simple ruffle to add to tote bags.  and for the actual bag, if you want a simple tote or gift bag you seriously can't go past the 20 minute tote tutorial for the purl bee website :)