Friday, September 30, 2011

day 113: home-made tarter sauce

perfect for the scallops!
day 113 and we are having some lovely fresh scallops for dinner tonight ... my favourite thing from the sea!  i have alway's wanted to make home-made tarter sauce and if i knew it could be this easy i would have started doing it a long time ago.

you simply add mayonnaise and a green relish together ... yes that is it!  this wonderfully easy recipe comes from easy to be gluten free! i pinned the directions to my recipe must do's board on pinterest.

creating doesn't get easier than this!

outcome: totally quick, simple, and very delicious.  i love with things like this you can make it to suit your family's taste.  i used a gerkin pickle because we love gerkins and fish together ... and this home-made tarter sauce absolutely rocked and as a bonus it was easy on the fat content too :)

my thanks to the easy to be gluten free website for this no fuss way to make the best tarter sauce ... the best part is you too can make it to suit your families needs and taste buds, love that!

update on the emergency kit: still going strong, today i added the lighters :)


Thursday, September 29, 2011

day 112: apricot and white chocolate cookies

day 112 and i wish i could tell you there was a special occasion today and i am baking for that but actually its just because the picture of these looks so good and i love white chocolate!  the recipe from lindsay and taylor at love and olive oil is pinned to my recipe must do's board.

it's not quite apricot season here so i used dried apricots for these cookies ... the rest of the recipe was carried out exactly as the recipe suggests :)

ready for the oven

a tin overflowing with cookies ... the kids were stoked!

outcome: it was hard to wait for an hour before cooking these ... the kids were hanging around like vultures ... they love white chocolate too!  was the wait worth it? totally if you love apricots and white chocolate, steve who prefers brown didn't love them as much as other cookies i have made, but still had four!  can't have been that bad aye!  they do spread and i had a couple of causalities off the side of the cookie sheet but luckily the recipe makes heaps (about 40) so it was a disaster to lose two to the bottom of the oven.  totally yummy, am going to try them with milk chocolate for the next batch :)

my thanks to lindsay and taylor at love and olive oil for sharing this recipe ... it's a winner with the kids and i and the combination of white chocolate and apricots works REALLY well ...  so very very yummy!

Wednesday, September 28, 2011

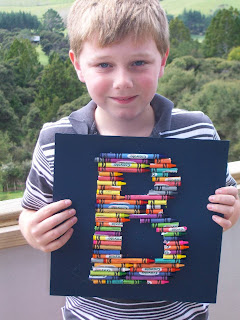
day 111: crayon art by the peeps


ben's finished work, he was so proud of it!
polly chose to decorate her card as well!
day 111 and its time to use some of these wonderful pinterest inspirations with the peeps.  today the peeps made crayon monograms inspired by the really cool one made by lisa from the blog well, how nice.  what i really liked about her monogram was it didn't have really well clean, defined edges, something i figured the kids would appreciate!  don't get me wrong, i absolutely adore the crayon monograms with the clean crisp lines (totally suits my personality) but i new the kids would grasp the project better and not worry about the need for perfect crayon placement so much when they saw the pictures of lisa's ... i love that hers has a more organic feel!

the peeps are currently looking at sculpture so this fitted in nicely, what better way to sculpt crayons than into your initial!  when they sat down for art they assumed they would be colouring in when they saw the boxes of crayons on the table ... ben looked at me and said "how much colouring do we HAVE to do?" he doesn't love art as much as his sister so the thought he was going to need several boxes of crayons was a little overwhelming for him!  and this was another great learning idea the kids took away from this project - looks can be deceiving, and what one item was designed to do doesn't mean it's the only thing you can do with it!

materials required

the actual project took two boxes of 24 crayons for each initial with very few left over.  we used a craft glue which they dunked the crayons into before attaching them to the cardstock.  i used a yellow sharpie to quickly draft each of their initials onto cardstock so they had a simple template to work to.  i helped them cut the crayons according to their specifications with a stanley knife.

such attention to detail!

her colours had to be perfect!

pollyanna's finished artwork 

benjamin's finished artwork

outcome: love that the peeps were totally fooled on what the art project was going to be!  they thoroughly enjoyed the process which probably took them an hour to complete.  it's amazing how much attention they paid to the crayon placement, i was totally stoked they gave this project such attention to detail.  tomorrow when the glue has set fully they will be an awesome addition to the classroom wall ... full of colour and each shows characteristics of their personality which is awesome :)

my sincere thanks to lisa from the blog well, how nice ... i love her monogram letter and these would be the perfect gifts for teachers and librarians ... especially if you get the kids involved to help!

Tuesday, September 27, 2011

day 110: tooth fairy bag

the finished tooth fairy bag :)
day 110 and we have some wriggly wiggly teeth around here!  to be fair the tooth fairy has never done a very good job around this house, we do holidays REALLY well but the tooth fairy often takes days to arrive and with ben's teeth we mostly forget to even get them under the pillow!  i have seen some really amazing parents do some wonderful things around the tooth fairy process and it has encouraged me to make a little more effort ... especially as both kids have teeth they will loose in the very near future given the wobbliness of them :)

i thought making this gorgeous little bag by molly at the purl bee might remind us more about - one, putting the tooth under the pillow and, two, hopefully the tooth fairy being a little less delayed in turning up ;)  i plan to safety pin it to the side of the pillow so its a visual reminder there needs to be a visit later in the night!  i pinned molly's creation to my sewing diy board on pinterest.

molly, who made these gorgeous tooth fairy bags even provides you with a template for the tooth pocket ... yeehaa!  i chose a light blue felt figuring it would work for both gender kids. you also need some ribbon, white felt, and some embroidery floss to complete the bag.

the bits and bobs required

ready to attach the tooth pocket

the finished bag with cute tooth pocket!

outcome:  i made this watching the rugby on tv tonight and it was a joy to make.  so much so i plan to give one to every future new born baby i know so their parents can do a better job of the tooth fairy thing than steve and i did!  really cool outcome, hopefully this will spur steve and i on to do a better job of remembering this childhood tradition.

my thanks to molly at the purl bee, i absolutely love this website.  its full of such wonderful diy craft's and this is not the first creation i have made from a tutorial on this site!  molly's sketchbook tutorial is brilliant and really comprehensive which makes it doable for anybody, regardless of crafting ability :)

Monday, September 26, 2011

day 109: button card

today's button card
 day 109 and i am still hooked on buttons today!  playing with the buttons yesterday making those bobby pins was so much fun, i wanted to use some more buttons in today's creation.  when you put "buttons" as a search in pinterest you get so much wonderful inspiration it was hard to know what to choose!

i decided on making a simple card as monday's are always a busy day around here with schooling and hockey and it's even more busy than usual with our house on the market and polly's broken leg!  today's creation is from jessica at how about orange.  jessica is REALLY creative and i have pinned several of her diy's to my pinterest boards!

she is very giving of her talents and has included a pdf so you can print your own stems and just add the buttons, how good is that!  i had five of my gran's vintage buttons i really wanted to use so i made up my own little stems in powerpoint using the basic shapes.  for christmas i plan to use jessica's pdf and print off a whole lot for the kids to add christmas buttons to for their christmas cards ... perfect christmas crafting for kids!

for this card i have printed it out on parchment coloured cardstock to give more of a vintage feel.  the parchment colour also matched the patterned paper i wanted to use which is always helpful :)  i used a craft glue and some heavy weight card for the base so the buttons wouldn't warp and bend the card when it stands up. i also inked all the edges to give even more of a vintage look.

my five flower template

materials you need :)

the finished product

outcome: easy and cute and i am really looking forward to the kids doing this as a christmas craft using jessica's pdf  template.  its achievable for them and they still have heaps of design input with regards to how and what buttons they add where.  i haven't put a sentiment on this card as one of the things that really appeals about the design is its versatility.  whether i use this card for a birthday, thinking of you, or as a note card it is still going to work!

thank you so much jessica at how about orange, not only is it a wonderfully designed card but also you give people the ability to achieve making it even if you aren't crafty ... i beat even my sister could do this with her one and only craft item, the glue stick!  this is the item i used and then had to replace while we were in singapore ;)

Sunday, September 25, 2011

day 108: button bobby pins

these were a little addictive because they
were so much fun and really easy to make!
i ran out of bobby pins before buttons ;)
day 108 and its time for some embellished bobby pins!  i was totally inspired by the bobby pins christina from a homemakers journal made herself with a collection of vintage buttons.  as i am currently considering growing my fringe out i thought these might come in handy! that and there is an upcoming holiday which i thought polly and i could have some homemade bling in our hair for ... really who doesn't want some halloween bobby pins!  this great idea is pinned to my general crafts board on pinterest :)

i did sew the buttons that had visible holes with thread before hot gluing them to the bobby pins.  for the pins with loops on the back i used a stanley knife to take the loop off, leaving a flat surface to adhere to the end of the bobby pin.

my gran's button stash ... it was a treasure trove of cool
buttons i wanted to adhere to clips!

a couple of reasons i took this photo: it shows the back loop
of the button i took off with the stanley knife and also
if you are making "sets" of clips make sure you set them
out facing in different directions then you won't need
to put a cat upside down in you daughters hair if she
wears one each side!

the pile of finished clips!

outcome:  i love vintage things so the ones with the vintage buttons on are my favourites and they will definitely come in handy for sweeping my growing fringe out of my eyes during summer!  as for the holiday ones, i think this a really great, cheap, easy option for having a little holiday bling for the girls in your life!

my sincere thanks to christina from a homemakers journal for posting about making her bobby pins when inspired by some she saw at a local market ... i love when great ideas become real :)


Saturday, September 24, 2011

day 107: the space between your fingers

love this saying AND its so true, i always feel so protected
when i'm holding his hand :)
day 107 and its time to head outside into the sun and get some chalk on the concrete!  i have been wanting to do something with a picture on concrete for ages ... absolutely love all the inspiration on pinterest where people have used concrete, chalk, and picture taking all in the same creation!

what better thing to chalk on concrete than an inspiration saying like the one pinned to my likes from here on google:

the spaces between my fingers are where yours fit perfectly

luckily my husband was happy to contribute ... love him so very much! 

and this is him!

outcome:  happily ever after ;)

we are off to see the all blacks play france, so nervous should be a really awesome event though
kia kaha all blacks :)

Friday, September 23, 2011

day 106: you are someone's reason to smile

i really need to get some cake decorating tips off pinterest!
 day 106 and we need comfort food in this house, it has been a week of highs and lows, busy and stressful, and i am so grateful it is friday and we can look forward to a weekend at home.

today's sentiment is pinned to my must have art board

you are somebody's reason to smile

i live with four reasons to smile and this week i haven't done that much of it, so i am hoping that when we have it for dessert tonight it will make us smile and lighten the load a bit, especially when it is served up on a chocolate cake ;)

the cake is pinned to my recipe must do's board and is called the fastest fudge cake from fine cooking.  this cake has me written all over it, it's a one bowl wonder with no heavy machinery required.  melt, whisk, mix, and pour ... then wait to cool. 

this turned out to be my mum's favourite
pinterest recipe yet! everyone had seconds,
which ironically was about how long the
cake took to make!


outcome:  pinners must pin with such integrity, this is another outstanding fudgy style cake ... i am seriously wondering when my first disaster creation from pinterest will happen ... i can tell you it won't be with this recipe though! the chocolate cake i made on day thirty five was outstanding so this one had a lot to live up to and it did.  both cakes are very different in style and texture so they are both being added to my sure fire winners when i need a cake made in a hurry.  this is the type of cake i LOVE to make, easy to bake but the results are outstanding!

my sincere thanks to the fine cooking website for this awesome recipe, if all the rest of them are this good i won't need another recipe book!

Thursday, September 22, 2011

day 105: inspiration always comes from books!

happiness is in a book :)
day 105 and today we are back to loving books ... for those who don't ... i'm sorry, for those that do or have kids that inhale them, you will love these sentiments!  i couldn't decide which one i wanted to put up on ben's wall so while i was picking up a frame for a creation i intend to make next week, i decided the same frame format would be perfect for today!

the frame holds eight 6" x 4" photos ... for this creation it is holding the following seven sentiments:

i was the kid that got into trouble reading past my bedtime

KEEP CALM and READ A BOOK

you are MY sunshine

reading is cool

his books are some of his very best friends

my favourite thing is to go where i've never been

i can't clean my room because i get distracted by the cool stuff i find

and a giraffe holding a pile of books pinned from we heart it. below are some photos up close of the finished product!


outcome:  i am really happy with this, some of the sentiments i wanted to use are from etsy shops, so those i will buy in canvas!  these ones i couldn't find owners for so figured they would be ok to use or typeset for my own needs ... the boy is VERY happy, well as happy as a boy who currently has a nose in a book and actually didn't notice the new artwork adorning his walls ... guess it was me that was VERY happy ... hehe :)

right, time to head back to the broken peep ... it's like caring for a baby again!  have a great day everyone :)

Wednesday, September 21, 2011

day 104: oh dear ... we have a break ... but not from the pinterest inspired creating!

a card for pollyanna (our mouse in the house!)
day 104 and the news for today is a little glum ... my little girl peep pollyanna has fractured her leg :( she tripped on a stair and struggled to walk yesterday afternoon.  i took her to the medical centre last evening and out we came with a leg plastered up to her knee.  after she went through the joyful stages of shock, she is now rather bummed she has a heavy plaster cast to lump around with her ... typically though she found the bright side, i didn't make her do any writing today, instead she watched beethoven lives upstairs movie (if you haven't seen it, do, it is amazing).

so today's sentiment is heading into a card for my little peep. the actual card was designed by sarah from the handmade card blog.  i have been itching to make this card because it's so cute, but it's one of those cards you really hope you don't need to make, let alone for your own little peep!  i pinned it to my paper crafts board and the following sentiment is found in my pinterest 'likes'

every.
single.
day.
i am grateful for you.

for the card you need to attach some plasters to a card, add googly eyes, and stamp or print your sentiment's inside and out!  then give to the little person who needs to know you care when skies are a little less blue.

the crafty bits and bobs you need

the card makes its destination!

the card has its desired effect!

outcome:  she has smiled through everything except when they had to put the plaster on and move her foot (that was more of a scream than a smile).  today it's fair to say her day has had it's share of glumness from excitement about having no school work to tiredness of the situation.  what made us both happy though was the card, she thought it was hilarious i had plasters stuck on a card for her :)  that made my day!

my thanks to sarah from the handmade cards, loved looking through her cards they are awesome, amazing techniques that i can only look in admiration at.


Tuesday, September 20, 2011

day 103: a thank you to my mum

just to let you know how much i love you mum
xxxxxx
day 103 and its time to say thanks to my sweet mum ... we live together and she is wonderful to me and my children, my children adore her. as we are so close both in a literal sense and as friends, i sometimes forget to take the time to tell her how wonderful she is, so today i am going to leave her a wee token on her bed so she knows.

this is the saying i found on pinterest and immediately added to my 'likes'

the only thing better than having you for a MOM
is my children having you for a GRANDMA

if you like this saying, you can buy it on etsy from piccadilly peddler who has it on a wooden plaque which looks really cute ... i'll have to see whether it comes with a 'mum' instead of a 'mom', would be a neat little gift for mother's day next year :)

today i am going to print it off on some lightly patterned paper, give it some bling, and wrap it around a chocolate bar, then leave it on her bed to find when she arrives home from work!  the only things i changed to personalise the saying for my mother was the mom to mum and the grandma to granny (what my kids call her).
buy chocolate, add a wrapper, and you are
good to go and make someone's day :)

happiness in acknowledging my mum today :)

outcome:  totally the desired effect! my mum loves it because it wasn't expected and she knows how much i appreciate and adore her ... awesome :)

thanks to piccadilly peddler for giving such a lovely saying a home on something permanent ... it's a fantastic idea!

Monday, September 19, 2011

day 102: roald dahl inspiration

the quote that is framed and now sits
next to her bed ... 
day 102 and today's quote comes from one of my favourite authors ... roald dahl ... love his books and so do my peeps, i mean, really, what's not to love about the bfg :)  i repinned the quote below onto my kids bedrooms board and the original pin was from jen fernie's blog.  the quote is from the minpins book written by roald dahl and published posthumously and i think it is so inspiring especially in today's world where we need to find a little more magic in the everyday given how fast we now live our lives.

the quote is:

And above all watch with glittering
eyes the whole world around you because
the greatest secrets are always 
hidden in the most unlikely places.
Those who don’t believe in magic
will never find it.
Roald Dahl

my daughter is as passionate about fairies as ben is about books.  for pollyanna the world is perfect, there are fairies and rainbows, sugared candy and ribbons, there are princes and princesses, and most definitely happily ever afters.  she sees the cup as always full, even when its full of air, and the world is most definitely full of fairies and elves doing wonderful things.  it could be her age, it could be her beliefs, it could be she sees things i don't see, but whatever it is i hope she never loses it.  so i have chosen to put this in her room to remind us all life doesn't have to be without magic, you just have to make the choice to believe in it and find it :)

i typeset the quote in powerpoint and printed it at home on photo paper ... i like the glossy look for something like this!  i then framed it and put it next to her bed.

i hope i spend more time with glittering eyes watching the
world's magic now ;)

outcome: my little girl peep has always inspired me to see things with open eyes and while this is in her bedroom i think it will do more for me seeing it each night when i tuck her in and kiss her goodnight than it will for her.  but if she ever needs reminding it will be there for her too :)


Sunday, September 18, 2011

day 101: reading is dreaming with open eyes :)

for ben with love
day 101 and some of my favourite time spent on pinterest is reading the inspirational, challenging, fun, thought provoking, and/or endearing quotes and sayings pinned to peoples boards.  i have many that are pinned to my boards that resonate with me for one reason or another.  this week i am going to spend a whole week dedicated to these quotes and sayings and use them in different ways, shapes, and forms!

today's creation uses this saying:

reading is dreaming with open eyes

it can be found on my kids bedrooms board and was originally pinned from the piccsy website and i loved it as soon as i saw it because it reminds me of my son ... my son reads and that's an understatement. he reads with passion like no one i know.  his best friends are books, once he finished hockey practice yesterday his best friend was a famous five omnibus.  he reads really fast, faster than his mum or dad because he needs to know the story once it has started and i love that.  even though he reads fast he never misses the details because that's what best friends do.  i dream when i listen to sport, for him it is books.

for that reason this saying is being made into a pillow for his bed ... just in case anyone forgets what books mean to him and why they are so important to him ... like me when i find him sitting by his door with his pillow using the hall light to finish reading a book at 9pm ... his aunt was just the same and luckily she turned out awesome (i'm not biased at all)!

the actual creation is really easy, i typed it up in word and then printed it out on fabric, sewed it into a cushion, and threw it on his bed!  if you haven't printed on fabric before, YOU SHOULD ... it's just so cool and the tutorial i did on day 28 from the pickled pepper patch gives you all the info you need to do it yourself :)

the printed saying on fabric

it's resting place :)

outcome:  a neat pillow with something special on it that reminds me how ben sees the world through books ... now that's a cool creation and what's more he loves it too :)

Saturday, September 17, 2011

day 100 ... we made it this far so lets make some halloween neighbour gift's :)

the halloween neighbour presents :)
day 100 and we have made it to the three digit milestone, only 265 days left in this adventure!  today we are making some quick and easy halloween gifts for the neighbours :)  halloween is always a busy time around here with birthday's and everything else that goes along with that time of the year.  i decided this year i would pop something in our neighbours letterboxes for fun for halloween.

i am going to use jen from a thousand words idea of giving gifts in wrapped pringles can's ... but instead of cookies i am going to give them pringles because it will mean they can be made and organised today :)  i pinned this jen's idea to my gift wrapping and gift ideas board on pinterest.  i would prefer to give them home baking but it can't be made in advance so that will have to wait for another occasion!

i am also using some free printables, happy halloween tags i found on eighteen25, and two halloween printables, this one from craftily ever after and this one from mrs. adventure.  all of these are pinned to my holiday goodness board :)

materials and printables needed
i went for the traditional colours of orange, black, and white for this creation.  i used scrapbooking paper to cover the cans and glued it down nice and firm.  the round halloween labels were stuck to the top and the other printables i used to adorn the sides of the canisters.  they were then wrapped in ribbon and ready to sneak into letter boxes later next month!

the covered pringles canister

the labelled and ribboned canisters

with happy halloween tags under the bows

outcome:  what's not to like, it's over a month away from halloween and i have gifts all ready to give.  actually these pringles cans are so easy to cover i will have to buy more just so i can wrap them ... they look so pretty when done :)

my thanks to a thousand wordseighteen25, craftily ever after, and mrs. adventure for all the wonderful inspiration and free printables that made my 100th creation possible :)

Friday, September 16, 2011

day ninety nine: reusable fabric wrapping sacks

present one wrapped and ready to send :)
day ninety nine and i took a second to wonder whether it was too early to think about christmas wrapping ... then realised NO it's never to early to think about christmas or the wrapping that will need to be done :)  if you are not a christmas addict, i am really sorry for bringing christmas into your year so early.

the other week my sweet mum and i went and did some early christmas shopping.  i try and spread mine christmas shopping out over the last half of the year to ease the financial pressure of my spending!  i thought i would also start my christmas wrapping early as well because i have found some much wonderful wrapping inspiration on pinterest and i want to make sure i have time to give lots of it a go.  i know if i leave it all until december the wrapping will take backstage due to time running out :)  all the wrapping ideas including today's are pinned to my gift wrapping and gift ideas board on pinterest.

today's christmas wrapping idea comes from keana who was a guest writer on the kanu hawaii website.  keana is an eco graphic designer and has written about ways to use less paper and more reusable wrapping ideas when it comes to christmas.  if you like the sound on fabric wrapping and don't have access to a sewing machine you can buy ready made reusable wrapping from here at lucky crow.

if you do have a sewing machine, i think its worth a go and that's just what i did today!  first i gathered my material, you need two co-ordinating fabric's for each gift sack. the next step is to measure the height of the present and the circumference.  once you have these measurements add 4" to the circumference and 6" to the height of the present, these new measurements give you the dimensions you need to cut out for the main fabric of your sack.  the second fabric is to line the top of the bag with so it adds some interest to the wrapping sack!  this piece needs to be the same width of the first fabric but only 6" in depth. some simple steps for creating these bags are below with photos :)

the two pieces of fabric cut and ready to sew
with right sides facing each other, pin and sew along what
is the top of the sack
iron this seam flat
with wrong sides facing iron the seam flat from this side now
now moving to the side of the sack pin together the side
seam with the right sides facing out to you (we are going
to do a french seam :) ... then sew with a 1/4" seam
now turn the sack so it is inside out and iron it flat, then
sew down the same side seam but with a 1/2" seam. turn
sack so it is now right side out ... isn't that a cool seam,
i love how it hides all the mess!
now turn to the the bottom of your sack and pin the end
closed then sew along this seam with a 1/4" seam (we are
also going to close the bottom with a french seam!)
then turn the sack inside out and sew along the bottom
seam again this time with a 1/2" seam.
turn the sack in the right way and its ready..
fill with the presents you measured earlier ....
tie the top with a ribbon and you can consider the present
wrapped!


i just need one of jen's awesome cards to adorn my package now ... hint hint ;)


outcome:  such a great idea ... i absolutely love that one of my sister's children will receive this gift for christmas and she will be able to use the wrapping the following year!  i plan to do some for my peeps gifts and will just stash the reusable wrapping in with the xmas decorations for next year ... COOL! they are really easy to make and don't take that long to finish ... pleased that i have started this early with my wrapping though, as i can't imagine taking this much care on christmas eve with everything else going on!

my thanks today goes to keana who has enlightened me in terms of reusable packing, it doesn't just need to be newspaper to make wrapping environmentally friendly ... get the sewing machine out and start making some gift sacks that can carry on giving long after the gift has been exchanged :)