Wednesday, August 31, 2011

day eighty three: roll up shopping bag

the shopping bag ... its actually much bigger
than you think because of the gusset
sides :)
day eighty three and given my new found knowledge of interfacing, i decided to undertake another project that involved the stuff today!  i found this roll up shopping bag tutorial from needle and spatula that used interfacing so that was all the inspiration i needed to start this creation :)  the tutorial is also pinned to my general crafts board on pinterest.

you need two fabrics and some ribbon ... and of course
a little bit of interfacing!
you need two contrasting fabrics, some interfacing, and ribbon for this project ... i see this bag coming in very handy but i shall have to check my sewing quality at the end before i am game enough to put anything heavy in it!  when i looked at the tutorial more indepth i panicked a bit because it called for french seams and gusseted sides ... neither of which i had sewn much if at all before!  however, the tutorial, once you start sewing and following the instructions, tells you exactly what to do and then has plenty of reference pictures and in the end it was all straight stitching ... perfect as i need the practise!

adding the handles and ribbon
the finished bag ... so cool
the rolled up bag ... this bag will be so handy
outcome: i made handles ... with interfacing (insert pride here) and attached them to a bag that has french seams and gusset sides!  the tutorial is so good, this is a perfect project for beginners at sewing and i really enjoyed making this bag.  not only that, i even trust it enough (because of the reinforced seams) to use it :)  ... oooh i could make christmas and halloween ones!

many thanks to kate for putting together such a wonderful sewing tutorial, i feel like my sewing improved heaps today and i learnt so much from making this bag, so again a big thank you to you.

Tuesday, August 30, 2011

day eighty two: cute wallet

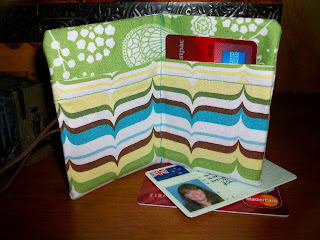
the very cool card wallet :)
day eighty two and we are heading to my sewing machine for today's creation.  this very cute wallet by kellie from the my so called green life blog will be today's creation and you can find it pinned to my general crafts board.

my first objective for this creation was to find some interfacing and actually determine what that was ... my local sewing shop was very helpful after laughing at me .... my sewing tuition continues thanks to pinterest!

add a sewing machine and this is what you require
the tutorial is brilliant once you get through the fastening options and it actually helped reading it once and then reading it again from start to finish with the cut pieces of fabric in front of you.  i chose the hair tie option for closing the wallet because that meant no hand sewing!  i also love that there is no hand sewing to close the insides because it all happens magically with the flipping of the pocket ... so CLEVER, well it is when you are a novice like me :)

the clever inside out pocket to finish the wallet :)
finished wallet fastened and it worked ... how cool is that!
the opened wallet complete with cards!
outcome: i was surprised at how little time this actually took to come together and immediately i thought this is a gift i would be proud to give!  i was particularly excited when my cards fitted into the wallet and my sewing looked almost straight!  these are fantastic and for the sewing guru's amongst you, this is a 10 minute sewing job with most of that involving cutting, for the rest of us 20 minutes and the creation is done from start to finish ... i have a very proud face on right now!

my sincere thanks goes to kellie, the tutorial made me feel empowered to sew this wallet and i am totally not surprised the tutorial for these gorgeous little wallets is the most popular post on your blog every week :)

Monday, August 29, 2011

day eighty one: soft and chewy chocolate chip biscuits

pollyanna's favourite cookies so far from pinterest :)
day eighty one and i am baking cookies ... the cupboards are bare mother hubbard!  there are two things i missed for my creating while i was away - my kitchen and my sewing machine ... so this week i aim to use both a lot! today its the turn of the kitchen with these delicious looking soft and chewy chocolate chip cookies by martha stewart.  i also really liked the combination of chocolate chips by katie at have stand, will mix, so i am going to do that as well!  you can find this creation on my recipe must do's board.

this recipe does require you to haul out the heavy mixing machinery, but as i've discovered all the best cookie recipes seem to require this step!  apart from that, the recipe was really easy to follow and the baking time is small, which is great for people with limited time :)
ben sifting the flour and baking soda

this is way my biscuits are never beautifully round!

soft and chewy chocolate chip biscuits :)
outcome:  i had little helpers with the baking today and i'm sure that's helped them taste oh so good :)  as a white chocolate lover, i totally love the combination of both chocolates, but if you are a real chocoholic you may just want to stick with the milk :)  pollyanna declared she thought they were the best cookies we had down from pinterest yet and actually its hard to disagree ... they were easy and tasted yummo :)

my thanks goes to martha and her crew for another outstanding cookie recipe and also to katie for adding in the variation of the two types of chocolate ... this totally worked for me and hopefully it will for you too :)

have a happy start to the week everyone, tomorrow its time to spend some quality time with my sewing machine!

Sunday, August 28, 2011

day eighty: baked potatoes in the crockpot

baked potatoes for dinner ... so good!
day eighty and its time for the crockpot to come in handy today!  we are out most of the day and i know after a really busy sunday no one will feel like cooking dinner tonight, so i started making dinner this morning in the crockpot thanks to a wonderful idea from skip to my lou.  pinned to my recipe must do's board is her cool idea for baked potatoes in the crockpot, what a perfect easy sunday dinner :)

its almost too simple to be true, just turn the crockpot on low and place in foil wrapped potatoes, walk away for 6 hours and return to a cooked dinner!

what you need ... 
... yeah it couldn't be easier!
and like magic dinner was ready bar some quick toppings :)
outcome:  and return we did, we were tired, but we arrived home to some well cooked potatoes!  we added kransky's, pesto's, cheese, and sour cream to the top of them and they were delicious.  the potatoes were really really well done so in future i will only put them on for 5 hours on low ... this is totally a personal preference but they really probably only need half a day in the crockpot if you a using small to medium spuds :)  obviously if you are using BIG ones 6-7 hours will be perfect!  i am definitely going to do this again especially on nights when the kids have sport because this provides instant, hot nourishment for the tired troops :)

many thanks to skip to my lou for this inspired dinner option, who knew that making dinner was going to be SO easy tonight ... not me, but it totally was ... so now the kids are fed, in bed reading, and i can sit back with a hot coffee (and maybe some of the chocolate i brought my mum back from singapore!) and relax into the evening ... oh and the dishes were a DREAM :)

Saturday, August 27, 2011

day seventy nine: flip flop/jandal buckets for summer and nz bottle winner :)

jandal/flip flop bucket :)
day seventy nine and it was a gorgeous day and felt like spring was coming ...  i felt inspired to start getting ready for the change in seasons :)  for most of the year i live in jandals (as we call flip flops here) except winter when my toes would freeze, the rest of the time i love my toes poking out of my footwear!  and today was a day worthy of having my toes free to the air and the warm sun ... and actually so did everybody else in my family, which caused an overflow of jandals by the front door AND the back door :(  i hate clutter and decided this was all the inspiration i needed to make the flip flop bucket i pinned to my ideas for organisation board on pinterest.  this wonderful idea is from jeri's organizing and decluttering news blog ... this blog is like heaven for those that LOVE being organised but don't have enough time to come up with cool ideas ... me!

it was late in the day when i discovered the mess at each door, so the shopping time was limited :) i tried my hardest to find some metal buckets so i could give spray painting a whirl but that will have to wait for another day.  what i did find was some very summery coloured plastic buckets for $2 that were the ideal size and price!  i also purchased some american crafts thicker letter stickers for the naming of my buckets so no family member will be left wondering what the buckets are for!

happiness is organisation ... right!
outcome:  i made two, one for the front door and one for the back door ... love the colours and while its a little early for summer i think the colours will work for spring as well.  i am a happy lass with my buckets holding the jandals, its cleaned up each door and ... even better i feel like some spring decorating now!  i just have to hope my delightful family remember to use them.

hoping these colours will work with the spring and summer
decorating i plan to do!
today's thanks goes to jeri and the wonderful decluttering and organising idea for jandals/flip flops, i am totally loving all the wonderful ideas for all sorts of storing and organising, this will not be the last one i use ... far from it!

it was really late last night when i realised i had not organised ben to find a winner for the nz bottle of mailed goodies ... so we did it today .... and the winner is DANIELLE :)  congrats to you, please send me your postal address to kahoonz@clear.net.nz and i will mail off the below drink bottle (this one is unused!) with your goodies.

it was early ;)

this is the bottle of goodies!

have a fabulous day everyone :)

Friday, August 26, 2011

day seventy eight: felt pinwheels

the completed present, ready with pinwheels
day seventy eight and i am decorating another present for a sweet little girl who turns two on sunday :)  rather than bows i wanted to change it up a little and i thought these felt pinwheels i pinned to my paper crafts would be perfect for my little friend. the pinwheel instructions are by allison of little lovelies by allison.  she has a VERY cute blog with lots of sweet ideas, i really enjoyed my visit to her blog and it won't be my last! i really loved her cards :)

present, check, felt, check ... we are good to go
i originally thought these were made from paper, but the ones in the instructions are made from felt and i thought they would be an idea present topper for a toddler.  i matched up some felt with the birthday paper i used and then cut 4 x 4" squares to make them with.  allison's instructions are fantastic, you simply can't go wrong as her photographic tutorial is so clear and these become a breeze to make :)

from start to finish

they add a really nice 3D element, don't you think :)
outcome:  i hope for the little lady i give this to will see just how special she is to us when she sees her present ... that's the hope anyway and if she doesn't i'll tell her anyway!  these pinwheels are cool and it is yet another present topper we can add to the list as being really effective, cheap, and shows that special person we are gifting to how much we care :)

many thanks to allison of little lovelies by allison for the super duper clear instructions, even the kids will be able to enjoy this craft and its definitely one i'll be teaching them as well as using them as present toppers!

Thursday, August 25, 2011

day seventy seven: tiered cake stand

the finished tiered cake stand :)
day seventy and we are organising for friday's daffodil day, which is a new zealand national fundraiser day for the fight against cancer.  for the last seven years the kids and i have always helped at a bake sale to raise funds and our tables are always laden with delicious baked goods for people to buy for a gold coin donation.

today's tiered cake stand creation is about adding some height to the table of goodies so we can squeeze even more on to sell!  this cake stand is pinned to my general crafts pinterest board and is inspired by the one on jamie cooks it up which is so cute and as a bonus she has the most wonderful family friendly recipe blog!

what you require for a tiered cake stand :)
i purchased two yellow plates (given its for daffodil day) and a glass candle stick.  i stuck the candle stick to the upside down smallest plate first and let it dry.  i then attached the candle stick and plate to the large plate right side up (if that makes sense!).

adhering the first plate to the candle stick
outcome:  totally awesome, i am SO happy with how this looks and i plan to make one for christmas, easter, and halloween to add some goodies to!  they are way too easy to make not to have many of these, my only issue will be storing all the different holiday ones i plan to make!  but in the meantime this one is set to have blueberry muffins adorn it for tomorrows bake sale, wish me luck :)

my sincere thanks to jamie cooks it up for the awesome idea and tutorial about putting together a tiered cake stand, its awesome and so are all the wonderful recipes on her blog :)

Wednesday, August 24, 2011

day seventy six: blueberry muffins

the finished blueberry muffins
day seventy six and it was REALLY hard getting out of bed this morning ... oh my, the kids slept until mid morning as jet lag took hold of us all.  luckily for today, we had nothing but laundry and unpacking planned, but for the rest of the week, we have plenty of things we need to get on with.  that said, i decided the kids would need something exciting to have for breakfast tomorrow morning to help entice them from their slumber.

so this evening i am making blueberry muffins for tomorrows breakfast, pinned to my recipe must do's board is a blueberry muffin recipe from the plated life website that claims these are the best ... cool!  i have had many disasters with muffins and i rarely bake them because they never turn out very nice, but the photos on this website and the really clear instructions made me want to try this recipe :)

the ingredients ready to mix together
this is my attempt not to over mix!
again, no heavy machinery required, only a whisk and some bowls ... i tried really hard not to over mix the batter, then launched them into the oven.  these bake at a high temperature for baking and mine still took a full 24 minutes to bake as they are really large (texas size) muffins :)

ready for the oven :)
outcome:  from the moment they started smelling, they were good!  they are really nice and moist inside with almost a crunchy outer layer, which sounds terrible but is so yummy and their was nothing that was dry about them unlike my usual muffin attempts ... actually they were so good i think i will make them for the daffodil day bake sale on friday :)

my biggest thanks goes to pamela at plated life, maybe my nightmare as a muffin maker is over thanks to some very good recipe instructions and an awesome recipe ... i'll dare to dream anyway :)


its time to send some new zealand goodies

day seventy six and its time to say a big THANK YOU to you all for coming and seeing what i am up to and especially for all those lovely people that leave comments, they honestly make my day!

i received a lovely comment from christina (hello :)) who received the bottle of singapore goodies i sent for my pinterest creation on day sixty two ... it's so good to know it arrived safely and you can see her opening it up with the goodies inside here on christina's blog :)

anyway i thought it would be fun to send some new zealand things to someone in the mail in another bottle given the success of my first bottle sending :)

if you would like to receive such a bottle please leave a comment over the next couple of days and i will get ben to randomly select someone again to send it to on Friday :)

today's pinterest creation will be up later today :)

Tuesday, August 23, 2011

day seventy five: no sugar oat drop cookies

perhaps not the most beautiful, but full of yummy flavour!
day seventy five and we are back in new zealand, i am so sad to have left my family behind, it was heartbreaking because we had the most amazing holiday with the people we love and adore spending time with.  i miss you so very much sis.

so with this in mind, a lack of quality sleep on the overnight flight, it was time to make some comfort food ... given how much food we ate on holiday i thought i had better make it a semi healthy option and the following cookies pinned to my recipe must do's board seemed to fit the purpose!  the recipe is from the really lovely blog of blueberry girl and they have no butter, sugar, flour, or eggs in them.

add the wet and dry ingredients together and you are good
to shape!
the other exciting thing about these cookies is they require no heavy machinery and come very close to being a one bowl wonder recipe ... you only need to mix all the dry ingredients in one bowl and the wet ingredients in another bowl, then combine and shape into cookies on a baking tray!  not bad i say :) remember these cookies aren't going to grow in size in the oven so shape them to the size you want the final cookie to be.

the shaped cookies ready for the oven :)
outcome: these are surprisingly good, i am somewhat amazed given there is no sugar, no butter, and no eggs involved!  they are really yummy, the banana adds a good amount of sweetness with the dried fruit and you get a nice crunch from the nuts.  they are definitely a wholesome winter cookie and they went so well with the cup of rhooibos i had with them!

my thanks goes to blueberry girl for this lovely recipe, it will be well used in this house as my husband is a diabetic (he is sweet enough!) so they fit the bill perfectly!

Monday, August 22, 2011

day seventy four: tic tac toe restaurant style!

tic tac toe in operation :)
day seventy four and its our last day in singapore for this trip :(  i am very sad, i hate leaving my sister and her family, we all get on so well and love spending time together so it is a difficult day.  to cheer up the glum little peeps, steve and i took them out for some lunch at the local coffee shop. 

what you need to get the game rolling!

this idea from how does she featured on be different act normal came to mind while we were waiting with sad kids for our order ... i didn't need it for keeping them sitting patiently, i just wanted to cheer them up a little because all they were talking about was their impending separation :(  this idea is pinned to my home school projects board and when i saw it, i thought it would be a perfect distraction in helping hungry kids who are sometimes impatient waiting for their order!

they were so happy to just sit and play
outcome:  really cool, i was surprised at how quickly this caught the kids imagination ... AND how they weren't that keen to stop even when the food arrived!  i must remember this definitely for future restaurant experiences when the kids get fidgety or are sad for that matter!  i think they loved the novelty of playing with utensils and food items, and that we parents didn't mind :)

the happy boys with their food
my sincere thanks to how does she for this wonderful idea featured on be different act normal ... its so nice to have positive options rather than just nagging the kids to sit quietly :)

Sunday, August 21, 2011

day seventy three: monogram tags for presents

the finished package for a special little girl :)
day seventy three and its time for some pretty packaging ... sam and isla are off to a birthday party for a little girl turning six!  pinned to my gift wrapping and gift ideas board is a fantastic, but simple monogram gift tag idea from martha stewart.

what you need :)
i just sketched a letter on rough paper and cut it out so i could use it as a template.  if you aren't confident at sketching you could just print off a large alpha from the computer and use that as your template.  the patterned paper i used was quite thin so i decided to matte the monogram to give it a bit more substance and make it less floppy!  i really like the effect this created and as it was for a girly girl, i added a bit of glitter for some added bling!

the matte and topper......

isla ready for the party....
outcome: the writing is all on the back of the monogram, so it makes a great tag, but the best part is the personalisation of the gift ... this is especially cool for little people that recognise their letter and feel excited by the present because they know it must be for them.  i loved this project, it was quick and easy but the effect was awesome :)

big thanks to martha stewart and her team of wonderful people that come up with such cool, useable ideas!

Saturday, August 20, 2011

day seventy two: chocolate lego minifig's

the chocolate in the ice tray worked well but not the m&ms!
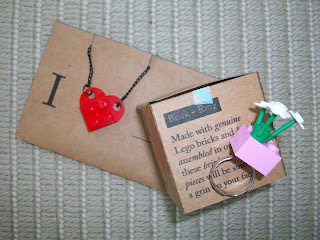
day seventy two and it's time for some more lego fun!  my sister and i went shopping this morning to haji lane where we found a gorgeous shop called threadbare and squirrel.  it has the most beautifully designed clothing, locally designed bags, and awesome bits and pieces! we also happened upon this lego necklace i had pinned to my whimsy board which i adore!  we are ALL lego lovers and this made me so happy.  my sister bought the ring with flowers and we felt like kids in a candy store where all your dreams come true!

our lego finds :)
that inspired me to carry on with the lego theme of the day and make some chocolate lego minifig's using the ice tray to adorn the top of the kids ice cream for dessert :)  this idea is pinned to my party ideas board and is inspired by justJENN's recipe website, she uses hers on top of cupcakes and they look SO cool!

the ingredients!
we decided to try and jazz them up a bit by adding a mini m&m to the lego minifig tummy :) apart from that all you need is the lego ice tray and some melted chocolate, and a cold fridge!

the lego minifig's with their m&m tummy's
outcome: not loving the m&ms but the rest of it is really cool an i would just stick with the chocolate for next time! simple is best, and am loving the fact that it worked awesomely well in the ice tray ... this is definitely something i will be using at ben's lego birthday party :)

my thanks to justJENN's for such a cool, simple, and totally doable idea ... it made us all smile and that makes it a winner with me :)

day seventy one: care package for isla and sam

the care package for sam taking shape!
day seventy one and we are enjoying our last few days in singapore with still so much to do ... sadly all the cousins are now starting to fret about the fact they will be separated soon and the holiday will finish :( 

so that isla and sam have something to look forward to after we leave, i am putting together a care package i found on pinterest (pinned to my gift wrapping and gift ideas board) from the martha stewart crafts department.

the idea is that you mail it to someone special, obviously i won't be sending this one but instead leaving it to be found somewhere after we have gone as a surprise :)

the goodies for the envelopes :)
i brought over some things with me with a new zealand flavour for the kids and am also using some things from singapore to stick in for each day ... just some little treats and i'm thinking it will work a little bit like an advent calendar but for only five days :)

the simply embellished envelopes :)

the instructions here are awesome and the embellishing you could do for this project is endless!  for today mine is simple but hopefully enticing for the little peeps these are for.  i love how the whole thing consertina's together and the last envelope flap folds over and seals the envelopes together so efficiently!

the finished care package for sam :)

outcome: hopefully the two little peeps who will recieve these in a couple of days time will love them, for now that outcome is pending :)  as for what i think of this care package ... awesome, love how the envelopes work together and that they are self sealing making it really exciting for the person recieving it ... just make sure that whatever number of days you do do, they are odd otherwise the sealing system won't work!

once again martha's craft department has come up with a gem, regardless of how you use this envelope care package, its bound to be a winner with the person who is gifted it .... and i will certainly be using this again, maybe even at halloween as a spooky advent in the lead up to the witching day!