Showing posts with label paper crafts. Show all posts

Monday, May 28, 2012

day 352: party favours for the upcoming pinterest party

pinterest party gift envelopes
day 352 and it's no secret i am getting close to my goal!  on the last day we are having a party to celebrate and with all good pinterest parties there's a whole lot of thank you's to make to those that have helped, supported, inspired, and taken the many urgent road trips to find vital supplies for the days creating.  i wanted to make something worthy of a pinterest thank you and have taken inspiration from clever charlotte's valentines felt envelopes as the perfect beginning.  this inspiration works perfectly with just something i made's envelope template to make the perfect pinterest thank you envelopes :)

the envelope template is available for free download at just something i made and is also pinned to my paper crafts board.  i printed the envelope out at half its size so the finished product would perfectly fit a gift card ... you can see where i'm going with this thinking ;)  the actual envelope was not stitched but glued together and then adhered with a pinterest logo i printed out then cut out in red felt.

the envelope template

half size is perfect for gift cards ;)

happily decked out with its pinterest logo!

outcome:  these are perfect for my needs.  thank you's for a long pinterest year happily sitting in hand made felt envelopes adorned with THE logo ... the ideal way to gift some love to those that have supported me unconditionally.  i think these bring together some of my favourite things from the year, felt and hand made ... if only i could find some way to add blackboard paint ... ;)

my thanks to clever charlotte and just something i made for the inspiration to come up with something i look forward to gifting out in 13 days time!  

Wednesday, May 16, 2012

day 340: a birthday card

hayley's birthday card :)
day 340 and polly's little friends birthday is getting nearer so its time to get creative and make a card for her.  i loved this card from kelley eubanks that was highlighted on the moxie fab world website ... who doesn't have a load of thickers with a ton of exclamation marks waiting for some inspirational use!  this card is also pinned to my paper crafts board on pinterest.

that's a lot of thickers that no longer spell may words!

i have plenty .... way too many thickers sheets with all the important vowels used up and lots of punctuation sitting, waiting, for use.

the lovely thing about kelley's card is you only need card and a pen to finish it with the exclamation marks!  yah, as many of you will know my paper crafting stash is minimal so this card works perfectly for me.  one of hayley's favourite colours is purple so rather than a white card i went with purple :)

the only other crafty things you will need :)

outcome:  i love that it uses so little but it's still funky and looks cool!  it took only 10 minutes to make which is awesome for me ... cards usually take forever for me because i don't know what i'm doing.

my gratitude to kelley eubanks for the awesome card she created, she is an amazing card designer and you can find heaps of her designs on her blog my front porch ... aaahhhh just another paper crafting guru i will be following ;)

Tuesday, May 15, 2012

day 339: mini scrapbook album

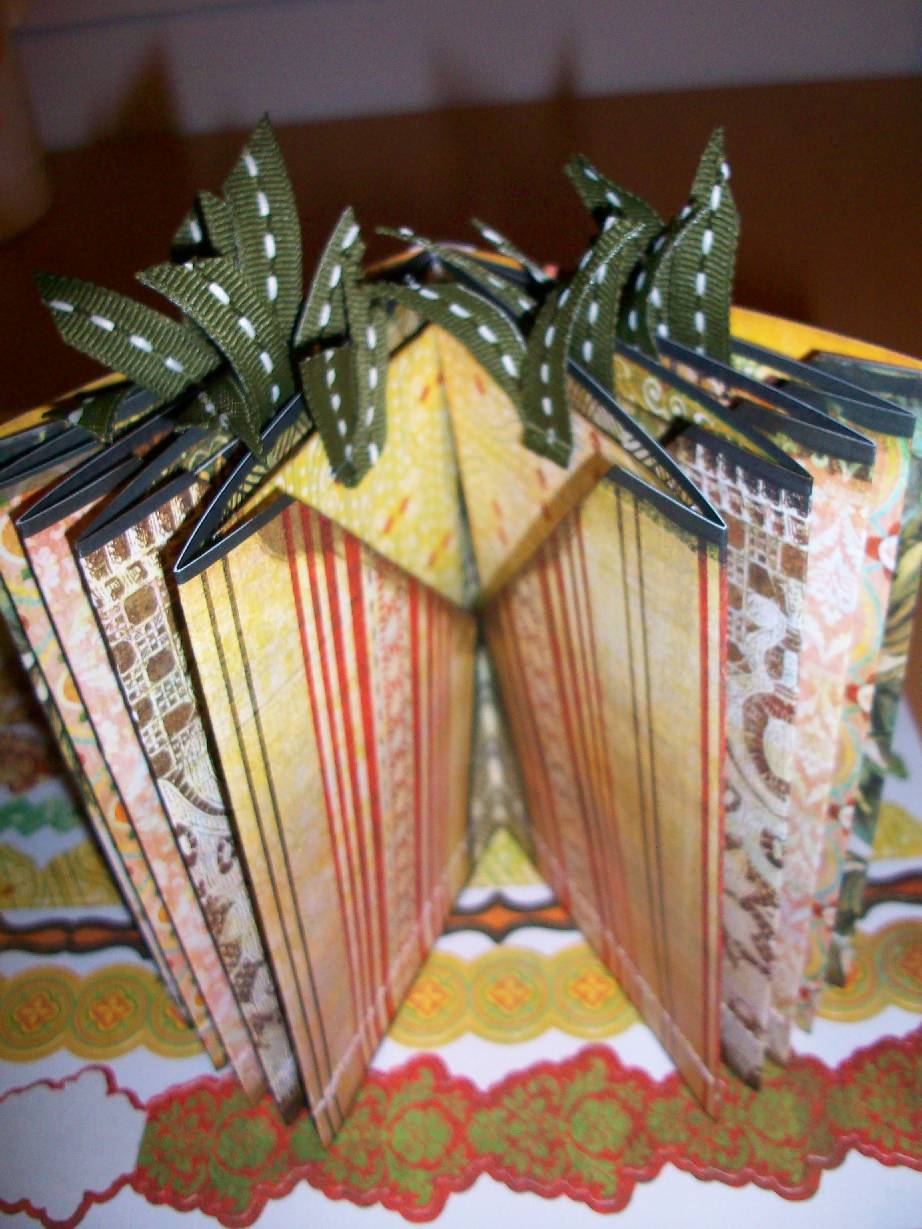
the finished album
day 339 and i have a whole lot of photos from last year's rugby world cup that i want to preserve in an album.  i found this gorgeous mini you tube clip that looks perfect in terms of the size of the album and the fact it holds lots of photos.  the you tube clip is by loretta, (you tube name ) and is pinned to my paper crafts board on pinterest.  loretta found the original instructions for this album on making mini scrapbooks and then modified it to allow more photos to be added.  

i love that this album is small but allows you to use lots of photos.  it uses 4 sheets of 12 x12 scrapbooking card in two colours, plus additional patterned papers and embellishments of your choosing.  i cut and scored all the papers before watching the tutorial as she provides written instructions for this part in the comments section which is really helpful.  then i played the tutorial and made it along with her.

the materials

now this is my type of crafting ... have video, can scrapbook!

the completed album ready for photos and embellishing!

done~

love how it folds and unfolds in surprising ways!

happy as larry with this pinterest creation!

outcome:  i loved loretta's video tutorial, it was easy to follow and the written instructions for the measurements really helped you get sorted before watching allowing you to make it as you went along with her.  the album is really cool how it all folds in on itself and continues to uncover more photos than you think are in there!

my sincere thanks to loretta and the awesome you tube clip she produced for this album.  without the clip it is probably an album i wouldn't have taken on as it looked complicated, but as it turned out it wasn't and it was a real pleasure to make :)

Thursday, May 3, 2012

day 327: felt flowers

the finished felt peonies ... so pretty :)

day 327 and things are really exciting at our place this week as my mum is going to retire tomorrow, nine months early!  i am so proud of her, she has worked so hard all her life and it is really rewarding seeing her move into a life after work where she can make daily choices according to her whim.  tonight we are going out to dinner with all her workmates and i am taking along some champagne.  as it's a special occasion i wanted to dress the bottles up a bit :)  on my paper crafts board, is pinned a template for making these paper/felt flowers. this is so apt for my mum as she plans to spend a lot of her retirement in the garden.  the template and design comes from yoonie at home and her completed flowers were used to adorn hair clips.  i figured i could glue a flower to each bottle with a little message.

i printed out the free template provided by yoonie at home on paper and then used the cut out  templates to trace out the patterns on felt.  then it was a case of assembling them according to the instructions.

what you need to complete today's project

all the cutting complete, not the fun part, the making!

the finished peony complete with leaves

and then they found their way to the bottles :)

outcome: so cute.  i have kept the templates for the future as these flowers would look gorgeous adorned to all sorts of things including presents, pillows, frames, towels, wreathes, cards, and just about anything else you can dream up!

my thanks to yoonie at home for the brilliant template that is definitely easy to replicate on felt and super easy to put together into flowers :)

Thursday, January 5, 2012

day 210: valentines day card

the finished card ... should have used the flash sorry!
day 210 and i am making a valentines card today using a very sweet card from K Werner Design for inspiration. i found this card on pinterest and thought it was so cute and loved how simple but effective it was.  i pinned it to my paper crafts board for a rainy day.  ok so it didn't rain today but i am having so much fun playing with the my memories software i figured trying to replicate this card using it sounded like a good idea for inside play ... so i pretended it was raining so i could stay inside and be crafty!

below is kristina's original card. isn't it perfect for valentines.  i absolutely love all the little details with the stitching and the offset button.  i became addicted looking at all her beautiful cards this evening and the little details she adds to all her cards are so cool.  as an added bonus she does a lot of video tutorials for card making, which is really helpful for non-card makers like myself!

such a pretty card :)

so on to my memories i went ...


and created this ....


not too bad for someone less than tech savvie!  the actual square was 5" x 5" when printed out.


i then matted it onto some card 11' by 5.5" so it was nice and sturdy :)

outcome:  pretty good, even if i do say so myself!  the software made it super duper easy and while i prefer the more 3D effect, at least i know i can make cute, personalised cards i can print in no time if i need something in a hurry ... which is often the case because i am easily distracted by crafts and pretty things on pinterest, and then all the awesome crafty blogs that i find thanks to pinterest ... yeah, that pinterest eats up a lot of your day ;)

a big thanks to kristina at K Werner Design for the gorgeous inspiration and the ideal excuse opportunity to play around with the my memories software again today!

speaking of which, don't forget to leave a comment so you can enter to win the software free, even if it's just to say hi :)

Saturday, November 12, 2011

day 156: pocket page mini album

the finished album complete with tags!
day 156 and today i am working with paper to make this really cute mini pocket album by jill a designer for october afternoon.  this pretty little album has been pinned to my paper crafts board on pinterest :)

this album could be a little testing for me as it involves the sewing machine ... yikes.  however i decided to give it a whirl and trust my elderly machine to be able to plough through five sheets of paper without care for tomorrow.  it is possible after i have done this to the sewing machine it won't be fit for sewing tomorrow.

you need 5 sheets of double sided paper cut to 5.5 x 12", a pair of scissors, and a scorer (if you want straight lines and have my ability to create curves out of perfectly straight paper).  the adhering for this mini album is all done with a sewing machine ... i know, amazing right?

all cut to size i am using the the basic grey curio
collection, thank goodness for a scorer ;)

cut the corners off and you are ready for sewing

i did it! i managed to sew an album together without
perforating the entire thing or breaking any needles!

make some tags to insert in your SEWN pockets and you
are done :)

outcome:  this took NO time to make for a mini album that is so cute.  i really loved the october afternoon paper that jill used in her album, really fun and ideal for an album like this.  the basic grey curio paper i used was not bad too and has given it a really vintage feel.  as for the sewing, the album is still together so that's a good sign!  i did have to strengthen the middle seam as i think i had the size of the stitches too small and it started to perforate so the basic grey curio border stickers came to the rescue and provided me with a perfect bind!

reinforced binding :)  just to be sure!

all in all this album is really cute and i am going to buy (in december!) some october afternoon papers so i can make one with pollyanna :)

my sincere thanks to jill, a designer for october afternoon. this is one of those albums that will be perfect for lots of occasions when you have a few photo's you want to pass on to friends and family as a thank you for a special occasion or as a gift for someone else to fill ... for either this little album would be ideal :)

ps: my little dear of a sewing machine hauled like a trooper so i will be able to sew tomorrow should the whim take me ;)

Wednesday, November 2, 2011

day 146: hello flower card

hello card
day 146 and i need a special card for someone i know and this one i found on pinterest looked perfect :)  i pinned it to my paper crafts board but unfortunately i can't tell you any more about who made the card even though i spent a lot of time looking for the original post about it on the making memories blog.  if you know where i can find the details of the maker of this card PLEASE let me know, i really hate not acknowledging people's skills :(

for my version of the this card i used the following bits and pieces from my stash given it's no spend november!  the flower was one i made on day four of this journey!

the bits and bobs

five petal fabric flower from day four!

outcome: it's a nice simple card and when i come to terms with my handwriting and doing cursive stuff i will gladly make this card again!

in other pinteresting delights i stumbled across craftaholics anonymous and their twice annual craft gift exchange which seemed too good an opportunity not to miss so i signed up for that as well today!


Monday, September 26, 2011

day 109: button card

today's button card
 day 109 and i am still hooked on buttons today!  playing with the buttons yesterday making those bobby pins was so much fun, i wanted to use some more buttons in today's creation.  when you put "buttons" as a search in pinterest you get so much wonderful inspiration it was hard to know what to choose!

i decided on making a simple card as monday's are always a busy day around here with schooling and hockey and it's even more busy than usual with our house on the market and polly's broken leg!  today's creation is from jessica at how about orange.  jessica is REALLY creative and i have pinned several of her diy's to my pinterest boards!

she is very giving of her talents and has included a pdf so you can print your own stems and just add the buttons, how good is that!  i had five of my gran's vintage buttons i really wanted to use so i made up my own little stems in powerpoint using the basic shapes.  for christmas i plan to use jessica's pdf and print off a whole lot for the kids to add christmas buttons to for their christmas cards ... perfect christmas crafting for kids!

for this card i have printed it out on parchment coloured cardstock to give more of a vintage feel.  the parchment colour also matched the patterned paper i wanted to use which is always helpful :)  i used a craft glue and some heavy weight card for the base so the buttons wouldn't warp and bend the card when it stands up. i also inked all the edges to give even more of a vintage look.

my five flower template

materials you need :)

the finished product

outcome: easy and cute and i am really looking forward to the kids doing this as a christmas craft using jessica's pdf  template.  its achievable for them and they still have heaps of design input with regards to how and what buttons they add where.  i haven't put a sentiment on this card as one of the things that really appeals about the design is its versatility.  whether i use this card for a birthday, thinking of you, or as a note card it is still going to work!

thank you so much jessica at how about orange, not only is it a wonderfully designed card but also you give people the ability to achieve making it even if you aren't crafty ... i beat even my sister could do this with her one and only craft item, the glue stick!  this is the item i used and then had to replace while we were in singapore ;)

Wednesday, September 21, 2011

day 104: oh dear ... we have a break ... but not from the pinterest inspired creating!

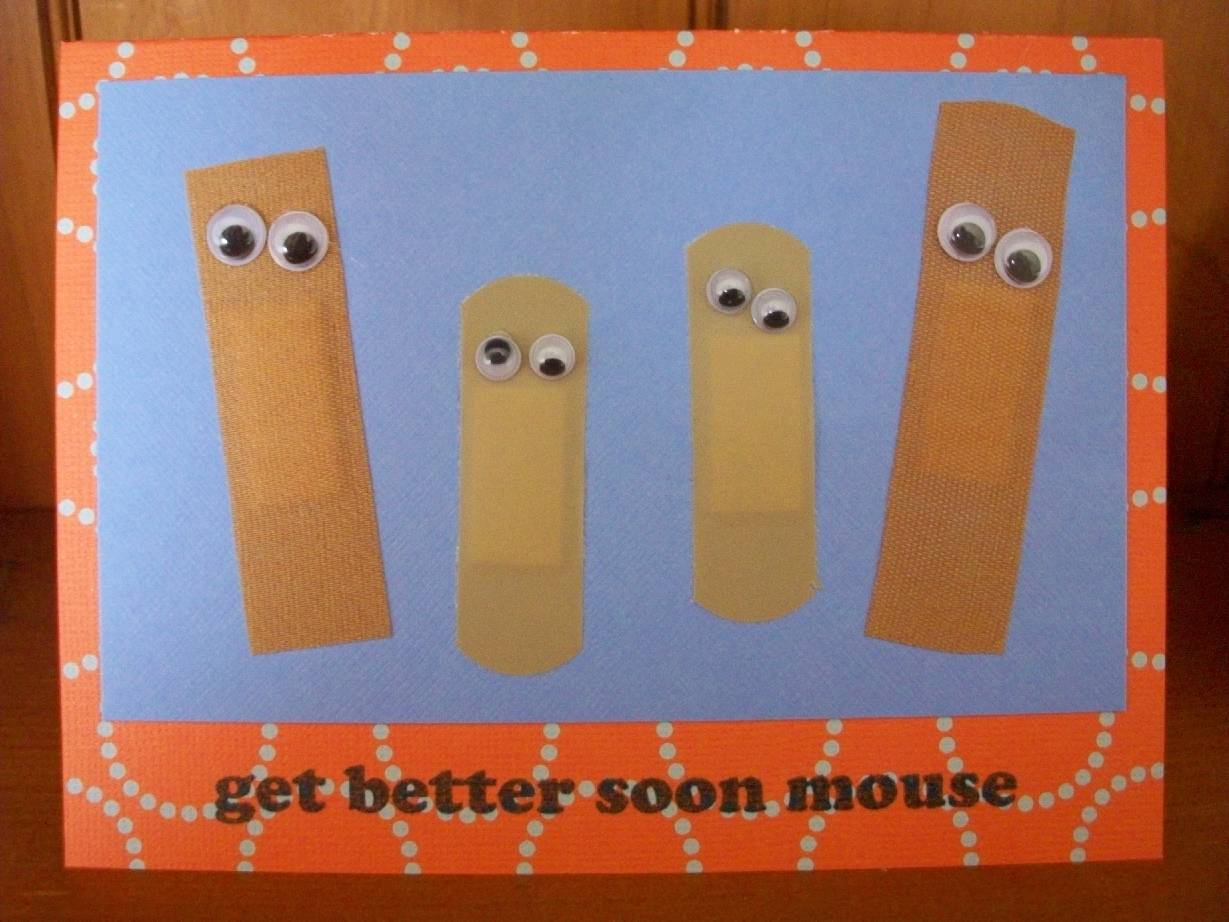
a card for pollyanna (our mouse in the house!)
day 104 and the news for today is a little glum ... my little girl peep pollyanna has fractured her leg :( she tripped on a stair and struggled to walk yesterday afternoon.  i took her to the medical centre last evening and out we came with a leg plastered up to her knee.  after she went through the joyful stages of shock, she is now rather bummed she has a heavy plaster cast to lump around with her ... typically though she found the bright side, i didn't make her do any writing today, instead she watched beethoven lives upstairs movie (if you haven't seen it, do, it is amazing).

so today's sentiment is heading into a card for my little peep. the actual card was designed by sarah from the handmade card blog.  i have been itching to make this card because it's so cute, but it's one of those cards you really hope you don't need to make, let alone for your own little peep!  i pinned it to my paper crafts board and the following sentiment is found in my pinterest 'likes'

every.
single.
day.
i am grateful for you.

for the card you need to attach some plasters to a card, add googly eyes, and stamp or print your sentiment's inside and out!  then give to the little person who needs to know you care when skies are a little less blue.

the crafty bits and bobs you need

the card makes its destination!

the card has its desired effect!

outcome:  she has smiled through everything except when they had to put the plaster on and move her foot (that was more of a scream than a smile).  today it's fair to say her day has had it's share of glumness from excitement about having no school work to tiredness of the situation.  what made us both happy though was the card, she thought it was hilarious i had plasters stuck on a card for her :)  that made my day!

my thanks to sarah from the handmade cards, loved looking through her cards they are awesome, amazing techniques that i can only look in admiration at.


Sunday, September 11, 2011

day ninety four: paper flowers from circles

paper flowers from circles, one used on a
christmas card
day ninety four and it feels like winter is back today ... so a good time for indoor creations.  today's inspiration comes from the whimsical world of laura bird blog and its her gorgeous paper flowers.  these were pinned to my paper crafts board on pinterest.  there were a couple of other tutorials for making these flowers on pinterest but after looking at the finished products and the different tutorials, i thought laura's final product looked the nicest and her tutorial was the easiest to understand!

what you need, paper and a way to cut out some circles,
if you don't have a cutter just trace around something
round that has a diameter about 1.5-2"
i thought i would make a start on my christmas cards with these flowers and i had some pretty graphic 45 christmas paper i have been itching to use. i used a 1.5" circle to make my flowers and a 2.5" circle for the base to place them on.  definitely used laura's idea of placing the first petals at north, south, east, and then west as it makes spacing them so much easier and you can get a nice tight placement of the petals.

the folding of the petals (i inked the edges of my circles
because i didn't want the white showing with the vintage
style graphics of the paper 
placing the petals on the circle base
the finished flower minus a centre
the finished flower with a centre, this one
is a brad but buttons would work just as
well on these really neat flowers
outcome:  laura's tutorial was brilliant from the folding to the placing, she gives you all the tips and tricks you need to make these beautiful flowers ... it's like doing origami without all the hard intricate folds!  once you are into the swing of folding the petals they actually don't take too much time once you have your circles cut, and if you have a circle cutter even that's not painful!  i loved the christmas card i made with the first one and think i will also add these cute little paper flowers to some of my presents as well!

my thanks to laura from whimsical world of laura bird for the really well put together tutorial for these paper flowers.  as i said earlier, i looked at a number of tutorials for these flowers but this was by far the easiest to understand and she even had great suggestions on how to put the flower together!

Tuesday, September 6, 2011

day eighty nine: a perfect card for spring :)

the finished card ... makes me feel like spring :)
day eighty nine and here in new zealand we are ienjoying our first days of spring for 2011 ... i wanted to do something with the feel of spring ... i pinned this gorgeous card by jen from JENerally speaking (such lovely crafty projects on her blog!) to my paper crafts board and it was exactly what i felt like creating today :)

have paper, will create!
i gathered some cardstock and some patterned paper and started with the easy things first ... the card size (6 x 6"), the tree and its trunk, then moved on to the more tricky parts!  i used embroidery floss as i couldn't find a twine that looked nice and nesty :)  the bird was drawn several times before one actually made it into the nest ... and that was the card done and dusted.

the easy bits

the finished card complete with bird number ...
yeah it was a few! maybe number 6 ;)
outcome: if i could come up with a magical fix for my lack of drawing skills i would make this card all the time ... it can be used for SO many occasions and even mine makes me smile and think of spring breezes and clear blue skies!  most of all i love the texture of the finished card, the nest gives it that unmistakable home-made feel and i really like that.

my sincere thanks to the talented jen, her cards and general crafty ideas are beautiful, if you have time i would definitely check her creations out :)