Showing posts with label singapore. Show all posts

Monday, August 22, 2011

day seventy four: tic tac toe restaurant style!

tic tac toe in operation :)
day seventy four and its our last day in singapore for this trip :(  i am very sad, i hate leaving my sister and her family, we all get on so well and love spending time together so it is a difficult day.  to cheer up the glum little peeps, steve and i took them out for some lunch at the local coffee shop. 

what you need to get the game rolling!

this idea from how does she featured on be different act normal came to mind while we were waiting with sad kids for our order ... i didn't need it for keeping them sitting patiently, i just wanted to cheer them up a little because all they were talking about was their impending separation :(  this idea is pinned to my home school projects board and when i saw it, i thought it would be a perfect distraction in helping hungry kids who are sometimes impatient waiting for their order!

they were so happy to just sit and play
outcome:  really cool, i was surprised at how quickly this caught the kids imagination ... AND how they weren't that keen to stop even when the food arrived!  i must remember this definitely for future restaurant experiences when the kids get fidgety or are sad for that matter!  i think they loved the novelty of playing with utensils and food items, and that we parents didn't mind :)

the happy boys with their food
my sincere thanks to how does she for this wonderful idea featured on be different act normal ... its so nice to have positive options rather than just nagging the kids to sit quietly :)

Sunday, August 21, 2011

day seventy three: monogram tags for presents

the finished package for a special little girl :)
day seventy three and its time for some pretty packaging ... sam and isla are off to a birthday party for a little girl turning six!  pinned to my gift wrapping and gift ideas board is a fantastic, but simple monogram gift tag idea from martha stewart.

what you need :)
i just sketched a letter on rough paper and cut it out so i could use it as a template.  if you aren't confident at sketching you could just print off a large alpha from the computer and use that as your template.  the patterned paper i used was quite thin so i decided to matte the monogram to give it a bit more substance and make it less floppy!  i really like the effect this created and as it was for a girly girl, i added a bit of glitter for some added bling!

the matte and topper......

isla ready for the party....
outcome: the writing is all on the back of the monogram, so it makes a great tag, but the best part is the personalisation of the gift ... this is especially cool for little people that recognise their letter and feel excited by the present because they know it must be for them.  i loved this project, it was quick and easy but the effect was awesome :)

big thanks to martha stewart and her team of wonderful people that come up with such cool, useable ideas!

Saturday, August 20, 2011

day seventy two: chocolate lego minifig's

the chocolate in the ice tray worked well but not the m&ms!
day seventy two and it's time for some more lego fun!  my sister and i went shopping this morning to haji lane where we found a gorgeous shop called threadbare and squirrel.  it has the most beautifully designed clothing, locally designed bags, and awesome bits and pieces! we also happened upon this lego necklace i had pinned to my whimsy board which i adore!  we are ALL lego lovers and this made me so happy.  my sister bought the ring with flowers and we felt like kids in a candy store where all your dreams come true!

our lego finds :)
that inspired me to carry on with the lego theme of the day and make some chocolate lego minifig's using the ice tray to adorn the top of the kids ice cream for dessert :)  this idea is pinned to my party ideas board and is inspired by justJENN's recipe website, she uses hers on top of cupcakes and they look SO cool!

the ingredients!
we decided to try and jazz them up a bit by adding a mini m&m to the lego minifig tummy :) apart from that all you need is the lego ice tray and some melted chocolate, and a cold fridge!

the lego minifig's with their m&m tummy's
outcome: not loving the m&ms but the rest of it is really cool an i would just stick with the chocolate for next time! simple is best, and am loving the fact that it worked awesomely well in the ice tray ... this is definitely something i will be using at ben's lego birthday party :)

my thanks to justJENN's for such a cool, simple, and totally doable idea ... it made us all smile and that makes it a winner with me :)

day seventy one: care package for isla and sam

the care package for sam taking shape!
day seventy one and we are enjoying our last few days in singapore with still so much to do ... sadly all the cousins are now starting to fret about the fact they will be separated soon and the holiday will finish :( 

so that isla and sam have something to look forward to after we leave, i am putting together a care package i found on pinterest (pinned to my gift wrapping and gift ideas board) from the martha stewart crafts department.

the idea is that you mail it to someone special, obviously i won't be sending this one but instead leaving it to be found somewhere after we have gone as a surprise :)

the goodies for the envelopes :)
i brought over some things with me with a new zealand flavour for the kids and am also using some things from singapore to stick in for each day ... just some little treats and i'm thinking it will work a little bit like an advent calendar but for only five days :)

the simply embellished envelopes :)

the instructions here are awesome and the embellishing you could do for this project is endless!  for today mine is simple but hopefully enticing for the little peeps these are for.  i love how the whole thing consertina's together and the last envelope flap folds over and seals the envelopes together so efficiently!

the finished care package for sam :)

outcome: hopefully the two little peeps who will recieve these in a couple of days time will love them, for now that outcome is pending :)  as for what i think of this care package ... awesome, love how the envelopes work together and that they are self sealing making it really exciting for the person recieving it ... just make sure that whatever number of days you do do, they are odd otherwise the sealing system won't work!

once again martha's craft department has come up with a gem, regardless of how you use this envelope care package, its bound to be a winner with the person who is gifted it .... and i will certainly be using this again, maybe even at halloween as a spooky advent in the lead up to the witching day!

Thursday, August 18, 2011

day seventy: lego minifig storage :)


the solution for storing lego minifigs and
as a bonus they look fantastic on the wall!
day seventy and i know four little peeps that love LEGO ... and at some stage they take over the dresser and everything that was on the dresser goes on the floor.  its time to take some pinterest action and find a new storage solution for these little lego people :)
   
a bunch of eager volunteers loitering about!
pinned to my kids bedroom board is this wonderful idea for lego minifigs in the form of some wall art from felix on mi muller.  how cool is this, we needed a more movable option given i have my house on the market and my sister is in singapore and who knows where next!  so it was off to ikea for some frames to suit each child's minifig collection (the frames at ikea are SO cheap i got some for ben and polly so i can do their's when we return!)  it was then off to the local lego store for a heap of 2 x 2 lego blocks, and then to the stationers for coloured backing paper.
 
materials organised
today i made the frames for isla and sam's minifigs.  isla's one we decided to have a non-structured approach with white backing paper and for sam's green backing paper to match his room and a structured approach to the blocks.  the actual blocks are then super glued to the glass and you are good to go :)
 
outcome:  LOVE THESE SO MUCH! i love that they are a hangable storage solution, they look fantastic in their rooms as art, but the minifigs are SO easy to put off and on even for our littliest peep when they want to play with them ... this may even be a new favourite pinterest creation, the photo's just don't do it justice :)
structured version - green background added to match the boys room

this picture shows the effect brilliantly

unstructured version - the finished article looks
really cool!
minifigs can be easily removed/replaced to
refresh the wall art
a huge thanks to felix on mi muller for this fantastic idea, i am absolutely certain whether you attach them straight to the wall or do the frame option you will love this way of storing lego minifigs!

Wednesday, August 17, 2011

day sixty nine: gift bows

bows, bows, and more bows i can now make :)
day sixty eight and there is a very special little girl who shares a birthday with my husband, who lives in perth, who we adore, and we have been hunting for a present for her in singapore ... we found something we think she will like yesterday so today we are wrapping it up to send to her ... and it needs a special bow!

about to set off in our pod to the top of the world :)
i have to admit the view was spectacular if you could get over
the fact you were 50 stories up on ferris wheel :)
today's creation comes from my gift wrapping and gift ideas board and is inspired by twig and thistle's felt gift bow who was inspired by the paper bow version from the gorgeous how about orange blog.  both these blogs are gorgeous and once again full of lovely ideas ... some many lovely blogs so little time to take it all in :)

i decided to make my paper one out of a singapore flyer brochure ... i am terrified of heights and THIS is what we chose to do last night ... all eight of us ... including ben and i who find my sister's 7th floor balcony challenging to be on.  i feel VERY happy to be here today to tell you about my creation for day sixty eight needless to say ;)

the basics for a felt bow ..  no hot glue so i used super glue!
the strips required plus one of them in the figure 8 glued
the instructions are really clearly explained on the how about orange blog and you get really helpful pictures to go with the words ... so helpful i ended up making a felt one and two paper ones in 20 minutes :)

ready to send this present now :)
bows just make everything look better!

outcome: i will never need to buy another bow again, these are really fun to make, the paper ones take no time with a stanley knife's help AND you can make them out of paper scraps so they don't even need to cost you any money to make ... and at times like this that's a really bonus.  i put the felt one on my present because its an international post and figured the paper one might get a little destroyed by the time it reached its destination!  my felt bow has a really chunky middle that i was worried about but actually it gives the flower a really nice bloom and doesn't affect the gorgeous outcome.  i absolutely love these bows and i know once you have made one you will totally feel the same :)

Tuesday, August 16, 2011

day sixty eight: album from one 12 x 12" sheet of paper

the finished album ready to fill with photos :)
day sixty eight and after a very sweet afternoon tea yesterday, we are heading to paper crafting today to make a keepsake for my sister for some of our holiday memories :)  pinned to my paper crafts board is a sweet 3 x 3" album made from one sheet of 12 x 12" paper and todays project is inspired by a video tutorial found on the srm stickers blog.

paper, a stanley knife or scissors, and a ruler is all you need!
the video is really helpful and is about 10 minutes long ... its actually long enough that if you have everything ready to go and you have watched it once, you can make it as the clip is playing :)

i used a non-directional patterened paper which makes the album much easier as you don't have to worry about which way your patterns are falling ... if you don't worry about these things, pick any paper and i am sure the finished album will look awesome.  i'm a little ocd about these things, so it was non-directional for me :)

all the cuts you need to make :)
i added to my sister's craft supply and purchased a stanley knife, and a ruler to help the process for this album.  as i didn't have my scorer with me, i used the back of a butter knife and the ruler, and it still does the trick beautifully :)  make the three cuts and then fold according to the clip. the nice thing with this album is if you fold it wrong you can undo it because you don't glue until the very end.  if you have never made a paper album this is a great one to start with because if you do go wrong it's only one sheet of paper!

the finished (bar the photos) album is only 3 x 3" (easy to post!)
outcome: really sweet, its amazing what you can make with one sheet of paper :)  very happy with this and as sasha says during her video, it makes the perfect gift album ... as i said this will be gifted to my sister full of photos of this holiday as a momento and i plan to make many more of these as gifts because they are the coolest size, quick, and easy to make!

many thanks to sasha who posted such a wonderfully explained tutorial on the srm stickers blog ... it was incredibly helpful and i absolutely love the end product :)

Monday, August 15, 2011

day sixty seven: a tea party for the peeps, a triple treat of inspired creations

a triple pinterest creation day :)
day sixty seven and its raining in singapore today :( so its time for some indoor entertainment in the form of a tea party :)  my sister and i went out and picked up provisions for making three pinterest goodies: chocolate dipped cherries (pinned to my recipe must do's board) inspiration from the simple girl at home blog ; chocolate and sprinkle rimmed glasses (pinned to my recipe must do's board) inspired from the hey gorgeous blog; and edible tea cups (pinned to my whimsy board) inspired by the ones found on the disney family website.

cherry dipping!
chocolate dipped cherries:  nice and easy, melt chocolate and dip in ... and for some extra tea party excitment dip the wet chocolate into sprinkles!

then add sprinkles!
dipped cherries outcome: these were the adult favourites for our tea party ... the sweetness of the chocolate and cherry worked really well with the crunchy sprinkles ... FANTASTIC combination for everyone :)

sincere thanks go to a simple girl at home for her inspiration to give this a go, i have always done strawberries this way but never cherries and they were absolutely delicious!

ready to dip the glasses!
chocolate and sprinkle rimmed glasses:  i also used shot glasses for the kids and simply dipped the glass rims in chocolate and then rolled them in sprinkles. we then put them in the freezer to harden and instead of milkshakes, filled them with ice cream!

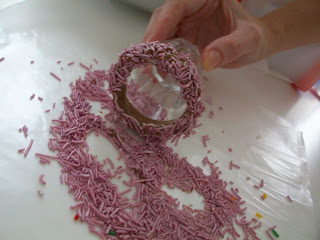
rimming the glasses with sprinkles :)

rimmed glasses outcome: the kids thought these were awesome ... its that little bit extra that always seems to wow the kids ... i guess like everybody, they know when somebody has gone to that extra effort for them and what i have noticed with my pinterest creating is that extra effort is SO worth it!  something i need to remember for the future because everybody loves to feel special :)

many thanks to hey gorgeous for this awesome idea, the milkshakes i am definitely going to do for another day because the directions and photos are mouth watering, just like the rest of her fantastic blog! 

ready to construct tea cups!
edible tea cups:  these were made using ice cream cones, gummy rings for handles, and some dundee shortbread cookies ... and then we filled them with singapore lollies :) 

the finished tea cup :)
edible tea cups outcome:  watch your childrens faces when you serve these up to them, THIS is tea party heaven!  they are so cool to make, take little time and are perfect for a treat, whether its a party or you just want to do something special for your peeps.  the kids felt so special when they sat down to our tea party and that made my day ... their faces and the excitment was priceless :)

my thanks to the disney family website for such a cool idea, something i never would have thought to do, but will definitely do many times in the future ... heaps of other wonderful ideas and printables on this site, if you haven't been and you have kids, take a peek.

the cake stand .. finally filled with goodies :)

a BIG, BIG thanks to my sister who helped with the creations for today, it's so fun when you do things like this with the people you love, for the people you love :) and it was also she who went and searched for cupcakes for the new cake stand ... thank you sis, love ya :)

the happy party goers :)

Sunday, August 14, 2011

day sixty six: homemade cake stand


the completed cake stand :) isn't it cool

day sixty six and its an easy one, but so effective and the results stunning :)  we are making a cake stand, which is pinned to my general crafts board and the inspiration comes from the happy housewife ... awesome site, really liked all the goodies and organising ideas :)

the candle stick and plate before being joined :)
i picked up this beautiful plate and candle stick from ikea ... this is truly my new favourite store, i so wish we had it in new zealand.  i simple used eyeometry to find the middle of the plate and eleplant glued the candle stick to the bottom ... this process i did upside down so you have more control :)  the happy housewife used hot glue, but remembering my sister's limited craft supplies, i was happy to find some super strong elephant glue at the local store to finish this project with!
i absolutely LOVE this creation
outcome: so so happy with this new cake stand, i am leaving this one for my sister but am going to head back to ikea (any excuse really!) and get another plate and candle stick so i can take them home and make one when i get back!  this is one of those creations you wish you had known about years ago and are totally happy to use for ALL occasions its so cool :)

a big thanks for the wonderful inspiration from the happy housewife, i really am so thrilled with this creation ... it could be my favourite so far ... ok i'm off to find some of singapore's finest cupcakes to put on top, will share later :)

Friday, August 12, 2011

day sixty four: paper boats

we are sailing :)
day sixty four and we are making some paper boats for the kids to float in the pond and they are pinned to my home school projects board.  the instructions and inspiration are available from wikiHow

the paper boat instructions are visual and explained ... love that, especially for those of us a little challenged in the origami, paper folding group (that's me).  we decided to make some coloured ones so the kids would know which one was their's in the pond. 

the making table

the great thing with these boats is once you have made a couple, they are actually really easy to teach kids how to make ... only the littliest peep didn't make her boat but she did decorate one!

decorating was taken very seriously
we also took some decorating tips from martha and her wedding boats ... you just never know where you are going to find valuable know how for kids projects!

the boats before their maiden voyage!
perfect for all ages, even the BIGGEST kids!
paper boats outcome:  the paper boat tutorial was brilliant, it was easy to understand and the pictures with words made sure you knew what you were doing.  the actual boats are awesome, the kids had just as much fun making and decorating the boats as floating them in the pond, which was also a great success.  the paper boats do go mushy after a while and sink to the bottom but if you use a waxy paper or make several you still have heaps of fun with them before they sink! the really nice thing about today's creation was watching all the peeps making their boats and how proud they felt of their finished creations .... then add water, the odd lego sailor, and watch the fun continue!

the big float off :)
a big thanks to wikiHow for a brilliant paper boat tutorial, this one was REALLY well done and i shall be back to attempt the other paper model tutorials i saw on the site!