Showing posts with label general crafts. Show all posts

Saturday, June 9, 2012

penultimate day: spray painting!

my new christmas friend, definitely reminds me of one of the reindeer but which one?
the penultimate day for pinterest 365 and i figured it was about time i got some spray painting done, i was prepared to spray paint ANYTHING today just to get some done before the end of the year.  i had LOTS on today so sent the rest of the family to the 2nd hand shop to find me something i could change the colour of.  they came back with this ... poor thing it looks as if it's seen a few christmas's and didn't have a lot of spirit left to give.  definitely a perfect candidate for makeover :)

becky higgins has spray painted a great many things to give them a second life and i love that she provides you with spray painting know-how in this post.  it's a really comprehensive list that gave me the confidence to take my reindeer out to the shed and give it a go.  the advice is also pinned to my general crafts board on pinterest.

i started with red and realised it wasn't a deep enough red to make it that really rich colour of christmas.  undeterred i decided to put a black on top and then do another coat of the red on top of that so it would give the red more depth.  after i had done the black it looked so cute in a warm chocolate colour i left it ... :)

the $5 find ... it was far more yellow it really life!


i masked over his eyes and nose before starting the spraying


i think it looks like comet ;)
outcome: this little reindeer will fight to see another festive season ... not finished with his trimming yet ... the christmas stuff is a little hard to get to today ... but the colour of his fur is much improved and gives me the perfect base to make him a little more festive at christmas with some bells etc :)

sincere thanks to  becky higgins for all the advice she offers in her various posts on spray painting.  i loved my first foray into this up-cycling area and have been going around looking at things i can redo with spray painting!

Monday, June 4, 2012

day 359: pallet bird decor for spring

the finished rustic bird decor for spring :)
day 359 and we are BUSY getting ready as we run out of days until the party ... yikes, scary!  we have a LOT of pallets around here as some of the crafts that party goers will be able to indulge in use pallets.  i found this pin on pinterest a while ago and as there were lots of pallet offcuts lying around today, it seemed like a good one to go with for day 359's project.  speaking of pallets, i promised you a picture of steve's home built free cape cod chair ... it's cool aye!


a tutorial is coming in early july for how you can make your OWN free cape cod chair

the button birds tutorial comes from angela of button bird designs and as she says this is a great project as it doesn't have to cost anything if you use what you have around.  i really loved the vintage look of her designs and immediately signed up to follow her :)  the tutorial is also pinned to my general crafts board on pinterest.

angela uses a combination of fabrics and papers to make her birds.  for my one i went with a couple of scrap papers i had that needed using from the vast pile of bits i have doing nothing ... ahh, this is such a satisfying project in so many many ways!  once the birdie pieces were cut, they are adhered to the pallet wood with mod podge or similar product.  then once the mod podge is dry, sew up a button and glue it to the bird as its eye ...

what you need, i used a picture from angela's blog as the bird template

templates cut, now mod podge them in place on a piece of rustic wood.

make sure you mod podge the entire front of the wood, then leave to dry

add an eye

done, day 359 is finished :)

outcome:  i love these, i am going to make a whole lot to put up in a collection for springtime.  they are so cool and i absolutely adore their rustic look.  oh, and did i mention how simple and cheap they were ... total bonus, but a great bonus nonetheless!

my heartfelt thanks to angela and her amazing design skills. i spent ages on her blog button bird designs looking at some totally inspiring projects that i am going to try in the coming months.


Saturday, June 2, 2012

day 357: pallet welcome sign

finally i have used some pallet wood on p365!
day 357 and i figured before the 365 days are up, i should really do something with pallets ... anything really pallets are everywhere on pinterest!  the ideas are endless, signs, bookcases, hanging gardens, headboards, tables, outdoor furniture, there are tons of uses for freebie wooden pallets.  steve, my dear husband, has just finished a cape cod chair out of free pallets ... it cost the sum total of $0 as he even used the carcoal fence paint to finish it off :)  as i am writing this its dark, so i will show you a photo of it tomorrow, it's very cool.  i am rather more technically challenged when it comes to wood and nails so i went for a project that required no building ;o)

i used this tutorial from jaime of that's my letter.  she personalises absolutely everything with names and shows you an awesome trick for how to paint perfect letters on wood every time.  you simply print out the word and then use a ballpoint pen to trace over it with the wood beneath giving you a slight indentation in the wood making it easy to just "colour in"!  given i am using pallet wood, mine is going to be far more rustic than hers so i am excited to see if it woods on rough wood as well.

i went with a welcome sign and decided to put the word doc at 100% to eyeball the size against the wood i was using.  then i printed and traced over the letters onto the wood ... then did some colouring ;)

getting the sizing right


if you look carefully you can see the outline of the traced letters :)

done :)

outcome:  not bad given the wood was so very very rough.  i am totally excited to do this again using something smoother given how cool this outcome was!  it looks really good next to all my white things, a nice contrast to their starkness.  totally recommend doing this as it really does work AND stops any runs escaping the letter you are working on thanks to the little indentation around each letter.

sincere thanks to jaime of that's my letter, have always wondered how to transfer typesetting onto wood without a silhouette machine and now i have the answer :)

Friday, June 1, 2012

day 356: fabric on walls!

polly's new barbie garden thanks to ironing fabric on walls ... can you hear the glee in my voice!

day 356 and i have been DESPERATE to try this idea since i pinned it a couple of months ago but thought i had better wait until we move into our new home before i deface any walls!  ironing fabric on walls totally intrigues because of the awesome and endless possibilities that it could open up.  i have given up waiting for our house to sell and decided to attack pollyanna's barbie house walls with some iron and fabric :)

this idea i found on this thrifty house who found it from the brassy apple ... i love that both ladies took a totally different idea for their iron wall art and they both came out fantastically.  i decided to start with some trees along the side of the house without the front door and some bushy shrubs would be a great start to pimping out polly's barbie house with fabric :)

i mocked up some templates for size then set to work cutting and adhering the bonding to the reverse side of the fabric.  then it was time to get down to ironing the trees and shrubs onto the actual house!

the magic ingredient for decorating walls with fabric ... this is what bonds the fabric to the wall ;)

the boring façade of polly's barbie house :)

the finished wall ... happy with a new garden!

outcome: there is nothing better than spending a friday night pimping out a barbie house with fabric, heat'n'bond, and an iron ... it was so much fun, i totally wish i had my own one to do!

many, many thanks to this thrifty house and the brassy apple girls for this wonderful crafty idea, i am totally pumped to move now just so i can graffiti our new home with fabric :)  .... come on house, SELL!

Sunday, May 6, 2012

day 330: diy canvases ... for halloween decor!

the finished halloween canvases!
day 330 and i have wanted to try today's creation for ages but it hasn't happened until today.  there are heaps of tutorials on pinterest for making your own photo/art canvases and they all look like they work wonderfully.  i would love to have more canvases on the wall but they are so expensive to buy so i am really hoping this tutorial from little bit funky works as well as her photo's suggest ... it didn't, our printer loves fabric but it did not like the tissue paper on its own :(  the tissue paper ended up screwed up in the middle of the printer and it took half an hour to unjam the printer!

determined not to give up, i went to another tutorial pinned on my general crafts board to do canvases from sarah's never-ending projects.  she also uses tissue paper but cellotapes it to a piece of standard A4 paper before it goes through the printer.  take two, for today's creation and running tissue paper through the printer ....  IT WORKED!!!

whole the issue was taped to the paper to get it through the printer .. left is the back, right is the front with the tissue attached

it worked! free graphic thanks to the graphic fairy

the next step is to use mod podge to glue the tissue to the canvas.  the idea is that the tissue is thin enough to take on the canvas look and feel once it is dry ... and guess what ... IT DOES!!

ready to see if i can master the next step!

finished and drying home made canvases !

so excited i went about my evening making three canvases in EARLY preparation for halloween :)  now i need my printer to conk out so i can buy a new A3 printer and do lots of large photo canvases, maybe i should put the tissue paper back through by itself a couple more times :)


my sincere thanks to sarah at sarah's never-ending projects for the brilliant tip on taping the tissue to a piece of A4 paper and also to little bit funky for the tutorial that really helped me with the adhering of the tissue to the canvases!  thanks also to the graphics fairy for the awesome, free vintage halloween printables i used on the canvases used to create today's halloween wall art :)


Thursday, April 26, 2012

day 320: altered letters

the finished altered tintin letters, ben LOVES these :)
day 320 and it's a short post today :)  HOCKEY TOOK OVER!  it's 7.30pm and i have just started on my pinterest creation.  on my general crafts board was a "pimped" letter using the page of a story. the idea comes from notbyamber and is listed on the made it australian handmade market.  such a cool site and i love her letters which are alpha based in terms of their picture book pages.

this had me thinking ... ben has a double up of one of his tintin books, he also has a couple of décor letters (his initials) in his room that were just asking to be altered ... letters + tintin book = a happy mummy as she can pimp his letters to add to his tintin/travel themed room!  music was literally singing in my head as i thought about this idea becoming reality :)

below is a pictorial illustration of the process i used to make ben's new tintin letters:

firstly place the letter on the book page so you make the most of the pictures underneath, then trace around the letter

then cut out the letter with scissors and/or a stanley knife

ink around the edges so you don't have that sharp, homemade cut look and also really important if you are using dark letters like i have.  this is so the edges blend in and you have a more finished, seamless look to your letter.

next glue the book page to the letter, i used mod podge because it dries without bubbling and is also a clear glue when dry :)

then let dry and you are good to say this altered project is done!


outcome: AWESOME and, given that i started these half an hour ago, not too labour intensive either.  BEN loves them and they have added a real personality to his room with the rest of the travel and tintin bits hanging around in their ... plus the lego!

my thanks to notbyamber for this fantastic idea.  if you don't need personalised letters for a particular theme, you can buy your own letters from notbyamber that are brilliantly monogrammed with book pages using the actual letter as the basis of the book page added .. very cool!

Friday, April 20, 2012

day 314: stencilled pillow

a pillow for my boy
day 314 and those that have been around for the last 300ish days will know i love anything that can be personalised .... and that i love a good pillow to decorate ... today i am joining those two things together again to make a pillow for ben's bedroom.  he has a room that has a bit of a travel thing going  thanks to his love on tintin.  all the travel things i love are generally REALLY expensive because they are more for adults than a tween or they are for toddlers and are more geared to transport than travel.

time to put purchasing aside and make something instead.  i was hooked on this pillow as soon as i read diy personalised pillow with ... stencils!  the shelterness website has a great, good to follow tutorial on how to use stencils to personalise a pillowcase for your home.  this creation is also pinned to my general crafts board on pinterest.

all you need is a permanent or fabric marker, cushion cover, cardboard, pencil, ruler, and stencils.  for this pillow i asked ben for his favourite places around the world, most he hasn't visited but loves the monuments of the city or country, or has some connection to them.  the pencil and ruler are for ruling straight lines on the pillow, and the card goes inside the cover of the pillow so there is no seepage through to the reverse side of the marker.

the materials needed

rule pencil lines and begin!

the finished pillow

an up close of the imperfections ;)

outcome:  a rustic which means not perfect pillow for ben's room that definitely adds to the travel items in his room he loves.  actually in real life it looks heaps better, go figure.  he likes it, i made it, not my favourite thing i have done so far, but not the worst either :)

thanks goes to the shelterness website for the cool tutorial that was really easy to follow and gave me plenty of inspiration to make a pillow befitting my boy peep!  

Wednesday, March 28, 2012

day 291: sentimental coin key rings

guess when kirsty was born......
day 291 and i am home ... not yet able to do the creating but i can type!  something i really wanted to do today,  mostly to thank all the lovely people that have commented and sent emails of kindness.  the operation was a huge success and i am on the very speedy recovery to full fitness.  i really wanted to thank you all for your kind thoughts, the support has meant heaps to me AND my family and has lightened our days with something good to focus on.  

my sweet (but hopelessly egg fanatic) has once again come to my aid and done the creating for today.  the nice thing about the last couple of creations is he has gone on my boards and found his own inspiration for the day.  i had completely forgotten about the sentiment coin key rings that were pinned to my general crafts board.  the idea comes from PATS DESIGN on etsy but she takes it a lot further and uses gorgeous personalised stamped copper rounds as well as the american coins.  if i was american, i would head straight to her site where you can purchase them ready personalised and without the need to hunt for the appropriately dated coins!

unfortunately new zealand coins and notes have gone through a number of changes during 1990, 1991 and 2006 with many of the old coins taken out of circulation during 2006.  coming across sentimental coins for steve and my birthdays is therefore a little tricky.  unbeknownst to me, steve has been searching the house, under cushions, in old money boxes, and all over, looking for coins sentimental to me.  he eventually found one from my birth year to begin my sentimental coin collection on a key chain.

the keys, the first of several coins (i hope) to be attached to kirsty's keys.  yes, she LOVES lego :)

safety first,  use a punch to mark coin before drilling
safety first, use grips to hold the coin while drilling

please don't slip please don't slip please don't slip.....

a quick polish to finish off

the flip-side of our old NZ 2 cent coin, the kowhai flower ... see kirsty's keys still have the nail polish from day 252

outcome:  i was very touched when steve came in this evening with today's finished creation, i love it ... and the fact it will be added to when i find more sentimentally dated coins!  i know for sure i will be flipping coins to see their dates now.  and, yes, steve is right with his comments under the photo's, i love lego almost, but not quite, as much as my family ;)  if you didn't have a currency that keeps changing its type, shape, and size these would also make great coffee charms, trinkets on gifts, flower centers, decorated pegs, all sorts of things if your supply of dated coins isn't limited!

my thanks goes to PATS DESIGN for the inspiration for today's creation. it such a fabulous idea that could be adapted for so many project ideas :)  and if you are american you can BUY it ready made ... now that's cool!

Monday, February 27, 2012

day 263: scrabble inspired easter trinket

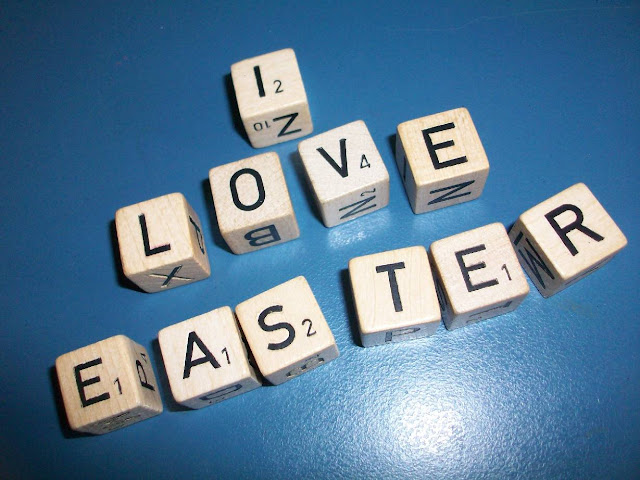
the easter decor trinket inspired by all the scrabble tile ideas on pinterest!!


day 263 has arrived and one of my dear friends scared the beegeeze out of me today when she said it was only a month until easter ... holy *$*@*@;^% where is this year going?  anyway, while i mildly panic at the fact we haven't yet saved a bean for our 5 week trip away at the end of the year that is coming up WAY too fast,  i felt inspired to make some easter decor today to put out in a couple of weeks time.

if you have ever been on pinterest, you would know there is a big love of scrabble tiles for all kinds of uses including wall art, coasters, ornaments, trinkets, cupcakes, tags, necklaces, and most other things you can think off for the home! i have even made scrabble frame art for my niece and nephew as part of pinterest 365 :)  today i thought  i would kick it up a gear and use letter dice from a game i had as a child called word yahtzee to make a little sideboard easter trinket.

all you need for today's creation is some dice with letters not numbers and some craft glue.  then you use a sentiment and glue it all together ..

the word dice

the sentiment that fits with the word dice ... this is the hardest part!

let glueing commence!

the final trinket, finished and ready for when the easter décor goes up :)

outcome: REALLY easy,  but you have to admit cute!  i love little things like this for decor, understated but people are immediately attracted to them because it's made of something everyone can relate to .... and seriously whether you are good or bad at scrabble, who can't relate to it!

my thanks go to the MANY wonderful creations i have seen on pinterest using  scrabble tiles  ...  it totally inspired today's creation and that is what pinterest and my 365 challenge are all about :)

Sunday, January 1, 2012

day 206: happy new year and a give away from my memories

happy new year
wishing all my dear readers the warmest of wishes for the coming year, may it be full of surprises and may it bring peace and happiness to you and your loved ones.


and perhaps the chance to win some awesome goodies from pinterest 365, starting with ....


day 206 and the first day of the a new year is always exciting, especially when you are surrounded by loved ones, relaxed, and planning for all sorts of good things to do for the coming year!  today is even more exciting as i have a wonderful give away from my memories  (digital scrapbooking company) to draw at the end of this week. they are going to give one lucky person their my memories suite!  the my memories software suite allows you to create your own scrapbooking pages, cards, albums, and so much more as you will see this week :) all you need to do is leave a comment and let me know which my memories kit you would like to see me make something with over the weekend ... that's it, easy aye!

for those of you who can't wait or don't want to take the chance on winning, my memories has also provided me with a code that will give my readers $10 off the my memories suite AND $10 to spend on additional kits ... although i have to say you get HEAPS of goodies with the actual suite, which was a real bonus i hadn't expected :)  the promotion code to use is STMMMS12847.

the finished 2D button monogram .. totally happy with this cute
little trinket box for polly


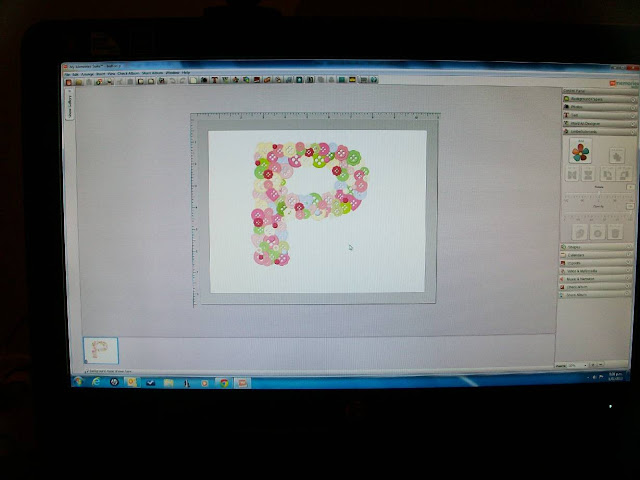
on with today's creation, which is something i have been wanting to do for AGES!  its's a button monogram, i have seen so many of these on pinterest and really wanted to make one but never seem to have enough buttons to make one worthy for the project :)  lucky there are plenty of buttons available for FREE on my memories so i thought i would give a digital one a go! 

this lovely green one i pinned to my general crafts board on pinterest is from jen at little adventures.  she described it as an awesome stash buster, so i figure one of my resolutions (along with learning to crochet and quilt) for 2012 is to get better and having more stash ;)  i'm betting my husband will think this resolution is unnecessary but he and i butt heads differ with regards to the need for a certain level of stash!

i used a monogram "p" inserted onto a digital page that i sized to A4 then added HEAPS of buttons and brads to the top of it before turning the monogram p white so you couldn't see it.  i then printed it out the size i needed to attach it to a gift box i had.  button monogram done!

started with a monogram

then added buttons and brads of all shapes and sizes to
over the original initial. 

printed it out ...

and attached it to the top of a gift box ...

before adding so ribbon ... because all girls who have
trinkets also love ribbon ;)
outcome: so so cute and while you could use this as a gift box with the recipients initial on top, this one is destined to be used as polly's trinket box.  she is a typical little girl who has little "jewels" she wants to keep safe and out of sight of everybody (including the kittens!) and this box will certainly do the trick :)   as a bonus for today's creation, i didn't burn my hands with the hot glue sticking buttons down!  i think the my memories software is a bit like photoshop in a lot of respects as you can manipulate and design all sorts of cool things OR take the cheats, but ever so practical, way and use all the ready made goodies to make bits and bobs in no time.

my thanks to jen at little adventures for the fantastic inspiration, one day my stash of buttons and brads may be big enough to do a 3D one, in the meantime i am absolutely stoked with the 2D version ... so my thanks must also go to the my memories software for making this creation so easy to achieve :)